


Java如何与Ansible自动化运维平台对接?
Java对接ansible自动运维化平台实现文件采集分发此次对接主要为以下两个功能:文件采集(对文件进行批量操作,包括批量从多台主机中采集共性文件如日志文件)文件分发(对文件进行批量操作,包括批量从多台主机中分发共性文件如日志文件)场景说明及ansibleyum安装因ansible没有Windows的安装包,所以为了方便测试,搭建了一套Linux环境进行后续工作。此次采用yum方式安装,在采用yum方式安装Ansible,首先安装EPEL源。yuminstall-yhttp://dl.fedoraproj
Java对接ansible自动运维化平台实现文件采集分发
此次对接主要为以下两个功能:
文件采集(对文件进行批量操作,包括批量从多台主机中采集共性文件如日志文件)
文件分发(对文件进行批量操作,包括批量从多台主机中分发共性文件如日志文件)
场景说明及ansible yum安装
因ansible没有Windows的安装包,所以为了方便测试,搭建了一套Linux环境进行后续工作。
此次采用yum方式安装,在采用yum方式安装Ansible,首先安装EPEL源。
yum install -y http://dl.fedoraproject.org/pub/epel/epel-release-latest-7.noarch.rpm
查看EPEL源中的Ansible版本
yum info ansible
直接安装此版本,如果有其他要求,请调整源,安装其他ansible版本
yum install -y ansible
安装完成之后,查看ansible版本信息
ansible --version
配置Ansible服务器清单
清单文件/etc/ansible/hosts,在此文件中编写节点主机的对应IP地址和端口
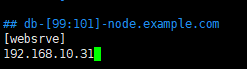
我这里只是做一个演示,其中IP后面可以添加节点真实的SSH的端口,在定义的内容上面有一个[]列表,里面的内容为自定义内容,方面为了操作绑定的节点主机,我习惯称之为分组列表
简单的认证一下,Ping一下添加的主机
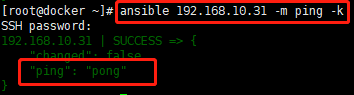
成功安装ansible !!
Java代码实现文件分发
顾名思义,文件分发就是把本机的文件分发到多个主机。
这时候就需要 Apache POI(大家可以去导入对应的包)来创建本机的文件了(ansible Host配置文件也通过POI创建)
POI创建文件工具类
package com.tiduyun.cmp.operation.utils;

import com.tiduyun.cmp.common.model.operation.HostInfo;
import lombok.extern.slf4j.Slf4j;
import org.apache.commons.lang.StringUtils;
import org.springframework.stereotype.Component;

import java.io.File;
import java.io.FileOutputStream;
import java.io.IOException;
import java.util.ArrayList;
import java.util.List;

/**
 * @author huyuan@tiduyun.com ansible创建文件
 */
@Slf4j
@Component
public class AnsibleCreateFileUtils {
    private final static String filename = "hosts";

    public static String passWordConnect(List hostInfo, String hostGroup , String directory) throws IOException{
        /** 在本地新建一个文件夹 里面创建一个文件 向里面写入内容 */


        // 创建文件夹对象 创建文件对象
        File folder = new File(directory);
        // 如果文件夹不存在 就创建一个空的文件夹
        if (!folder.exists()) {
            log.info("创建了文件夹{}" , folder);
            folder.mkdirs();
        }
        File file = new File(directory, filename);
        // 如果文件不存在 就创建一个空的文件
        if (!file.exists()) {
            try {
                log.info("创建了文件{}" , file);
                file.createNewFile();
            } catch (IOException e) {
                log.error("error data{}" , e);
            }
        }
        // 写入数据
        // 创建文件字节输出流
        FileOutputStream fos = new FileOutputStream(file);
        try {
            List list = new ArrayList<>();
            for (HostInfo data : hostInfo) {
                // 开始写
                String string = data.getHost() + " ansible_ssh_pass=" + data.getPasswd() + " ansible_ssh_user="
                    + data.getAccount() + " ansible_ssh_port=" + data.getPort();
                list.add(string);
            }
            String splicingData = StringUtils.join(list, "\n");
            String str = "[" + hostGroup + "]" + "\n" + splicingData;
            byte[] bytes = str.getBytes();
            // 将byte数组中的所有数据全部写入
            fos.write(bytes);
            fos.flush();
            log.info("文件内容{}" , str);
            // 删除文件
            // deleteFile(file);
            // 关闭流

        } catch (IOException e) {
            log.error("error data{}" , e);
            throw e;
        }finally {
            if (fos != null) {
                fos.close();
            }
        }
        return directory;
    }

    public static void deleteFile(File file) {
        if (file.exists()) {// 判断路径是否存在
            if (file.isFile()) {// boolean isFile():测试此抽象路径名表示的文件是否是一个标准文件。
                file.delete();
            } else {// 不是文件,对于文件夹的操作
                    // 保存 路径D:/1/新建文件夹2 下的所有的文件和文件夹到listFiles数组中
                File[] listFiles = file.listFiles();// listFiles方法:返回file路径下所有文件和文件夹的绝对路径
                for (File file2 : listFiles) {
                    /*
                     * 递归作用:由外到内先一层一层删除里面的文件 再从最内层 反过来删除文件夹
                     *    注意:此时的文件夹在上一步的操作之后,里面的文件内容已全部删除
                     *         所以每一层的文件夹都是空的  ==》最后就可以直接删除了
                     */
                    deleteFile(file2);
                }
            }
            file.delete();
        } else {
            log.error("该file路径不存在!!");
        }

    }
}
创建主机组配置文件
注:ansible分为两种连接方式,这里采用的是密钥连接,生成的文件已拼接密钥!!!后续的采集与分发都要用到这个。(如有不懂的小伙伴,可以去查找一下ansible的连接方式)
    @Override
    public void ansibleCreateHost(HostInfo hostInfo, String Key) {
        ParamCheckUtils.notNull(hostInfo, "hostInfo");

        List HostIp = Arrays.asList(hostInfo);
        for (HostInfo data : HostIp) {
            String ansiblePassWd = data.getPasswd();
            String PassWd = hostInfoService.decode(ansiblePassWd);
            data.setPasswd(PassWd);
        }
        try {
            AnsibleCreateFileUtils.passWordConnect(HostIp, ansibleConfigurationItemVo.getHostGroup(),
                ansibleConfigurationItemVo.getDirectory());
        } catch (IOException e) {
            log.error("Failed to create host configuration{}", e);
        }
    }
实现文件分发
主机配置文件已经配置好,接下来就是执行ansible对应的命令,通过Java拼接ansible命令。
执行命令工具类
package com.tiduyun.cmp.operation.utils;

import lombok.extern.slf4j.Slf4j;

import java.io.BufferedReader;
import java.io.IOException;
import java.io.InputStreamReader;
import java.nio.charset.Charset;

import static cn.hutool.db.DbUtil.close;

/**
 * @author huyuan@tiduyun.com ansible执行命令工具类
 * upload 上传文件
 * createRemoteDirectory  创建远程目录
 */
@Slf4j
public class AnsibleExecuteTheOrderUtils {

    private final static String commandBin = "/bin/sh";

    private final static String commandC = "-c";


    /**
     *  创建远程目录
     */
    public static void createRemoteDirectory(String hostGroup, String remotePath, String directory) throws IOException {
        Runtime run = Runtime.getRuntime();
        String[] cmds = new String[3];
        cmds[0] = commandBin;
        cmds[1] = commandC;
        cmds[2] =
                "ansible " + hostGroup + " -m command -a " + "\"mkdir " + remotePath + "\"" + " -i " + directory + "/hosts";

        // 执行CMD命令
        Process p = run.exec(cmds);
        log.info("ansible远程执行命令为{}", cmds[2]);

        BufferedReader br = new BufferedReader(new InputStreamReader(p.getInputStream(), Charset.forName("UTF-8")));
        try {
            String lineMes;
            while ((lineMes = br.readLine()) != null)
                log.info(lineMes);// 打印输出信息
            try {
                // 检查命令是否执行失败。
                if (p.waitFor() != 0) {
                    if (p.exitValue() == 1)// 0表示正常结束,1:非正常结束
                        log.error("命令执行失败");
                }
            } catch (InterruptedException e) {
                log.error("error data{}", e);
            }
        } catch (IOException e) {
            log.error("fail to carry out command{}", e);
            throw e;
        } finally {
            if (br != null) {
                br.close();
            }
        }

    }

    /**
     *  文件分发
     */
    public static void upload(String hostGroup, String localPath, String remotePath, String directory)
        throws IOException {
        Runtime run = Runtime.getRuntime();
        String[] cmds = new String[3];
        cmds[0] = commandBin;
        cmds[1] = commandC;
        cmds[2] = "ansible " + hostGroup + " -m copy -a " + "\"src=" + localPath + " dest=" + remotePath + "\"" + " -i "
            + directory + "/hosts";
        // 执行CMD命令
        Process p = run.exec(cmds);
        log.info("ansible命令为{}", cmds[2]);

        BufferedReader br = new BufferedReader(new InputStreamReader(p.getInputStream(), Charset.forName("UTF-8")));
        try {
            String lineMes;
            while ((lineMes = br.readLine()) != null)
                log.info("ansible输出信息为 :" + lineMes);// 打印输出信息
            try {
                // 检查命令是否执行失败。
                if (p.waitFor() != 0) {
                    if (p.exitValue() == 1)// 0表示正常结束,1:非正常结束
                        log.error("命令执行失败");
                }
            } catch (InterruptedException e) {
                log.error("error data{}", e);
            }
        } catch (IOException e) {
            log.error("fail to carry out command{}", e);
            throw e;
        } finally {
            if (br != null) {
                br.close();
            }
        }

    }

    /**
     *  文件采集
     */
    public static void fileCollection(String hostGroup, String remotePath, String localPath , String directory) throws IOException {
        Runtime run = Runtime.getRuntime();
        String[] cmds = new String[3];
        cmds[0] = commandBin;
        cmds[1] = commandC;
        cmds[2] = "ansible " + hostGroup + " -m fetch -a " + "\"src=" + remotePath + " dest=" + localPath + " force=yes backup=yes\"" + " -i "
                + directory + "/hosts";

        // 执行CMD命令
        Process p = run.exec(cmds);
        log.info("ansible远程采集文件命令为{}", cmds[2]);

        BufferedReader br = new BufferedReader(new InputStreamReader(p.getInputStream(), Charset.forName("UTF-8")));
        try {
            String lineMes;
            while ((lineMes = br.readLine()) != null)
                log.info(lineMes);// 打印输出信息
            try {
                // 检查命令是否执行失败。
                if (p.waitFor() != 0) {
                    if (p.exitValue() == 1)// 0表示正常结束,1:非正常结束
                        log.error("命令执行失败");
                }
            } catch (InterruptedException e) {
                log.error("error data{}", e);
            }
        } catch (IOException e) {
            log.error("fail to carry out command{}", e);
            throw e;
        } finally {
            if (br != null) {
                br.close();
            }
        }

    }

    public static void ExecuteTheOrder(String command) throws IOException {
        log.info("start execute cmd {}", command);

        String[] cmd = new String[] {"/bin/bash", "-c", command};
        Runtime run = Runtime.getRuntime();
        Process p = run.exec(cmd); // 执行CMD命令

        BufferedReader br = new BufferedReader(new InputStreamReader(p.getInputStream(), Charset.forName("UTF-8")));
        try {
            String lineMes;
            while ((lineMes = br.readLine()) != null)
                log.info("输出信息为 {}", lineMes);// 打印输出信息
            try {
                // 检查命令是否执行失败。
                if (p.waitFor() != 0) {
                    if (p.exitValue() == 1)// 0表示正常结束,1:非正常结束
                        log.error("命令执行失败");
                }
            } catch (InterruptedException e) {
                log.error("error data{}", e);
            }

        } catch (IOException e) {
            log.error("fail to carry out command{}", e);
            throw e;
        } finally {
            if (br != null) {
                br.close();
            }
        }
    }

    public static void disconnect() {
        try {
            close();
        } catch (Exception ex) {
            // Ignore because disconnection is quietly
        }
    }

    // public void execute(String command) throws Exception {
    // log.info("start execute cmd {}", command);
    // try (Session session = sshClient.startSession()) {
    // Session.Command exec = session.exec(command);
    //
    // Integer readLineCount = 0;
    // InputStream in = exec.getInputStream();
    // log.info(IOUtils.readFully(in).toString());
    // String errorMessage = IOUtils.readFully(exec.getErrorStream(), LoggerFactory.DEFAULT).toString();
    // log.info(errorMessage);
    // if (exec.getExitStatus() != null && exec.getExitStatus() != 0) {
    // throw new RuntimeException(
    // "exec " + command + " error,error message is " + errorMessage + ",error code " + exec.getExitStatus());
    // }
    // log.info("exec result code {}", exec.getExitStatus());
    //
    // }
    //
    // }
}
接下来就是调用
package com.tiduyun.cmp.operation.service.impl;

import cn.hutool.core.util.RandomUtil;
import cn.hutool.core.util.StrUtil;
import com.tiduyun.cmp.common.model.flow.UploadFile;
import com.tiduyun.cmp.common.model.operation.ComponentInfo;
import com.tiduyun.cmp.common.model.operation.HostInfo;
import com.tiduyun.cmp.common.provider.service.ExceptionBuildService;
import com.tiduyun.cmp.operation.constant.OperationExceptionCode;
import com.tiduyun.cmp.operation.constant.StartCmdSeparate;
import com.tiduyun.cmp.operation.model.AnsibleConfigurationItemVo;
import com.tiduyun.cmp.operation.model.vo.FileQueryVo;
import com.tiduyun.cmp.operation.service.AnsibleTaskRecordService;
import com.tiduyun.cmp.operation.service.ComposerDeployService;
import com.tiduyun.cmp.operation.service.HostInfoService;
import com.tiduyun.cmp.operation.service.UploadFileService;
import com.tiduyun.cmp.operation.utils.AnsibleExecuteTheOrderUtils;
import lombok.extern.slf4j.Slf4j;
import org.apache.commons.collections4.CollectionUtils;
import org.apache.commons.lang3.StringUtils;
import org.springframework.beans.factory.annotation.Autowired;
import org.springframework.beans.factory.annotation.Value;
import org.springframework.stereotype.Service;

import java.io.File;
import java.util.ArrayList;
import java.util.Arrays;
import java.util.List;

@Slf4j
@Service
public class AnsibleDeployServiceImpl implements ComposerDeployService {

    @Value(value = "${cmp.operation.commandHeader:cmd /c}")
    private String commandHeader;

    @Value(value = "${cmp.operation.filePath:/data/cmp/file}")
    private String filePath;

    @Value(value = "${cmp.operation.remoteFilePath:/tmp}")
    private String remoteFilePath;

    @Autowired
    private AnsibleTaskRecordService ansibleTaskRecordService;

    @Autowired
    private AnsibleConfigurationItemVo ansibleConfigurationItemVo;

    @Autowired
    private UploadFileService uploadFileService;

    @Autowired
    private HostInfoService hostInfoService;

    @Autowired
    private ExceptionBuildService exceptionBuildService;

    @Override
    public void deploy(HostInfo hostInfo, ComponentInfo componentInfo, String cpmposerName) {
        ansibleTaskRecordService.ansibleCreateHost(hostInfo, null);

        try {
            String remotePath = StringUtils.join(remoteFilePath, "/", cpmposerName, "-", componentInfo.getName(), "-",
                RandomUtil.randomString(3));
            log.info("remote file path = {}", remotePath);

            List fileIds = getFileIds(componentInfo.getFileUrl());
            if (CollectionUtils.isNotEmpty(fileIds)) {
                FileQueryVo uploadFileQueryVo = new FileQueryVo();
                uploadFileQueryVo.setIds(fileIds);
                List uploadFiles = uploadFileService.query(uploadFileQueryVo);
                for (UploadFile uploadFile : uploadFiles) {
                    String path = StringUtils.join(filePath, uploadFile.getFilePath());
                    File file = new File(path);
                    if (!file.exists()) {
                        log.error("file url is {}", file.getPath());
                        throw exceptionBuildService.buildException(OperationExceptionCode.FILE_NOT_EXIST,
                            new Object[] {uploadFile.getFileName()});
                    }
                    // 创建远程目录
                    AnsibleExecuteTheOrderUtils.createRemoteDirectory(ansibleConfigurationItemVo.getHostGroup(),
                        StringUtils.join(remotePath), ansibleConfigurationItemVo.getDirectory());

                    // 分发文件
                    AnsibleExecuteTheOrderUtils.upload(ansibleConfigurationItemVo.getHostGroup(), path,
                        StringUtils.join(remotePath, "/", uploadFile.getFileName()),
                        ansibleConfigurationItemVo.getDirectory());
                }
            }
            List startCmds = getStartCmds(componentInfo.getStartCmd());
            if (CollectionUtils.isNotEmpty(startCmds)) {
                String cdCmd = StringUtils.join("cd ", remotePath);
                String execCmd = StringUtils.join(startCmds, ";");
                execCmd = StringUtils.join(cdCmd, ";", execCmd);
                log.info("execCmd= " + execCmd);
                // sshClient.execute(execCmd);
                AnsibleExecuteTheOrderUtils.ExecuteTheOrder(execCmd);

            } else {
                log.error("parse startCmd fail {}", componentInfo.getStartCmd());
            }

        } catch (Exception e) {
            log.error("主机[{}]部署[{}]组件失败,主机ID[{}],组件ID[{}]:", hostInfo.getHost(), componentInfo.getName(),
                hostInfo.getId(), componentInfo.getId(), e);
            throw exceptionBuildService.buildException(OperationExceptionCode.EXECUTE_CMD_ERROR,
                new Object[] {e.getMessage()});

        } finally {
            AnsibleExecuteTheOrderUtils.disconnect();
        }

    }

    @Override
    public boolean isSupport(HostInfo hostInfo) {
        return true;
    }

    private List getFileIds(String fileIds) {
        List ids = new ArrayList<>();
        if (fileIds == null) {
            return null;
        }
        String[] split = StringUtils.split(fileIds, ",");
        for (String s : split) {
            ids.add(Integer.parseInt(s));
        }
        return ids;
    }

    private List getStartCmds(String startCmd) {
        List cmd = new ArrayList<>();
        if (startCmd == null) {
            return cmd;
        }
        String[] split = StrUtil.split(startCmd, StartCmdSeparate.SIGN);
        cmd.addAll(Arrays.asList(split));
        return cmd;

    }

    public static Boolean needCd(String s) {
        String[] splits = StrUtil.split(s, "&&");
        int maxIndex = splits.length - 1;
        String cmd = splits[maxIndex];
        if (StrUtil.startWith(cmd, "cd")) {
            return false;
        } else {
            return true;
        }

    }
}
文件采集
同上,调用两个工具类
@Override
    public void fileCollection(HostInfo hostInfo, String remotePath, String localPath) {
        ansibleCreateHost(hostInfo, null);
        try {
            log.info("remote file path = {}", remotePath);
            log.info("local file path = {}", localPath);

            // 文件采集
            AnsibleExecuteTheOrderUtils.fileCollection(ansibleConfigurationItemVo.getHostGroup(), remotePath,
                localPath , ansibleConfigurationItemVo.getDirectory());
        } catch (Exception e) {
            log.error("主机[{}]文件采集失败,主机ID[{}]:", hostInfo.getHost(), hostInfo.getId(), e);
            throw exceptionBuildService.buildException(OperationExceptionCode.EXECUTE_CMD_ERROR,
                new Object[] {e.getMessage()});

        } finally {
            AnsibleExecuteTheOrderUtils.disconnect();
        }

} 










Postman是一套面向API全生命周期的开发与测试平台,可在Mac上发送和调试多种协议请求,管理集合、环境及认证信息,并完成脚本测试、模拟服务、监控、文档发布和团队协作。它适合开发、测试及运维人员使用,提供个人免费方案。
Docker Desktop 是 Docker 官方为 Mac 提供的容器开发环境,集成 Docker Engine、命令行工具、Compose、Build、Kubernetes 与图形化管理界面。

Android Studio 是 Google 面向安卓应用开发提供的官方集成开发环境,基于 IntelliJ IDEA 构建。它整合智能代码编辑、Gradle 构建、界面预览、设备模拟、性能分析、调试测试及 APK 分析等工具。

Xcode 是苹果面向 Mac 提供的官方集成开发环境,将代码编辑、项目构建、SwiftUI 实时预览、设备模拟、自动化测试、断点调试、性能分析和应用分发整合在同一套工作流中,适合开发与维护 iPhone、iPad、Mac、Apple Wa

JetBrains WebStorm 是面向 JavaScript、TypeScript 和现代 Web 技术的专业集成开发环境,可智能理解项目结构,提供代码补全、重构、错误检查、运行调试、测试及 Git 工具。

PhpStorm 是 JetBrains 推出的专业 PHP 集成开发环境,可在 Mac 上完成代码编写、智能检查、重构、调试、测试和数据库管理。它支持主流 PHP 框架、Composer、Git、Docker 与远程解释器。

JetBrains PyCharm 是面向 Python 开发者的集成开发环境,提供智能补全、代码检查、重构、调试、测试、版本控制及虚拟环境管理功能。Mac 版兼容 Intel 与 Apple 芯片,核心功能可免费使用。

IntelliJ IDEA 是 JetBrains 推出的专业集成开发环境,重点服务于 Java、Kotlin 与 JVM 项目开发。软件集成代码补全、静态检查、重构、调试、测试、版本控制及构建工具,并可借助插件扩展语言和框架支持。

Visual Studio Code 是微软提供的免费代码编辑器,支持 macOS,并为 Intel 与 Apple 芯片 Mac 提供适配版本。软件集代码编辑、调试、Git 源代码管理、集成终端和扩展市场于一体。

REAPER是Cockos开发的数字音频工作站,提供多轨音频与MIDI录制、剪辑、处理、混音和母带制作工具。Mac版兼容Intel与Apple芯片,支持AU、VST、VST3、CLAP等插件格式,并提供高度可定制的工作流程。

Adobe Audition 是面向播客、影视后期、音乐制作及内容创作者的专业音频工作站,提供波形精修、多轨录制与混音、频谱编辑、降噪修复、响度匹配和效果处理工具,并可与 Adobe Premiere 协同完成视频声音制作。

Pro Tools 是 Avid 推出的专业数字音频工作站,覆盖多轨录音、无损剪辑、MIDI 编曲、插件处理、自动化混音及声音与画面同步等工作。它拥有 Intro、Artist、Studio 和 Ultimate 等方案。

PixPix 是面向品牌、卖家和内容团队的在线 AI 图片视频创作平台,提供图视频 Agent、无限画布、图片生成、视频生成、自然语言编辑及商品套图、产品精修和带货视频等电商工具。

Postman 是面向 API 全生命周期的开发与协作平台。Windows 桌面版可用于构建和发送 HTTP、GraphQL、gRPC、WebSocket、MQTT 等请求,并提供环境变量、集合、脚本测试、模拟服务、监控、文档及团队工作区等

Docker Desktop 为 Windows 开发者提供集成式容器环境,内置 Docker Engine、命令行工具、Compose、Build 与 Kubernetes 等组件,可在本机完成镜像构建、容器运行、日志查看和资源管理。

Android Studio 是 Google 面向 Android 应用开发提供的官方集成开发环境,以 IntelliJ IDEA 为基础,集成智能代码编辑、Gradle 构建、设备模拟、界面预览、调试测试及性能分析工具,

WebStorm 是 JetBrains 面向 JavaScript、TypeScript 和现代 Web 技术打造的集成开发环境。它提供项目级代码分析、智能补全、安全重构、导航搜索,并集成调试、测试、终端、Git 与常用前端工具,

PhpStorm 是 JetBrains 面向 PHP 与现代 Web 开发打造的专业集成开发环境,提供代码补全、静态检查、重构、调试、测试、数据库、版本控制及前端语言支持。Windows 用户可直接下载安装程序,

PyCharm 是 JetBrains 推出的 Python 集成开发环境,提供智能代码补全、错误检查、重构、调试、测试、Git、终端及 Jupyter Notebook 支持。统一版安装后可体验 30 天 Pro 功能,

JetBrains IntelliJ IDEA 是以 Java、Kotlin 和 JVM 项目为核心的专业集成开发环境,提供智能补全、代码检查、安全重构、调试、测试、版本控制及构建工具集成。统一发行版的核心功能可免费用于商业和非商业项目,

Visual Studio Code 是微软推出的免费代码编辑器,Windows 版集成智能补全、代码导航、调试、终端和版本控制,并可通过扩展添加语言、格式化及远程开发能力。它启动较快、配置灵活,

REAPER 是 Cockos 推出的数字音频工作站,适用于录音、MIDI 编曲、音频编辑、混音、母带制作及声音设计。软件安装包小巧,支持多轨录制、灵活路由、自动化、第三方插件和脚本扩展,并提供完整功能的 60 天免费评估期。

Adobe Audition 是面向播客、影视后期、广播与音乐制作的专业音频工作站,提供波形编辑、多轨混音、频谱分析、录音、降噪修复和效果处理等功能。Windows 版通过 Adobe Creative Cloud 安装和管理,

Pro Tools 是 Avid 推出的专业数字音频工作站,提供多轨录音、音频剪辑、MIDI编曲、插件处理、自动化混音及影视声音制作能力。它适合音乐人、录音师、制作人和音频后期团队使用,并提供免费入门版、订阅方案及永久授权选择。