


springboot如何整合mqtt
springboot整合mqtt搭建的时候如果你使用的是集群记得开放以下端口:好了,搭建成功下一步就是我们的java程序要与mqtt连接,这里有两种方式(其实不止两种)进行连接.一是直接使用MQTTJava客户端库二是使用springintegrationmqtt也是比较推荐的一种,也是我们主讲这种.第一步添加mavendependencyorg.springframework.integrationspring-integration-mqtt5.5.14第二步添加配置1先写好一些基本配置mqtt:us
springboot 整合 mqtt
搭建的时候如果你使用的是集群 记得开放以下端口:
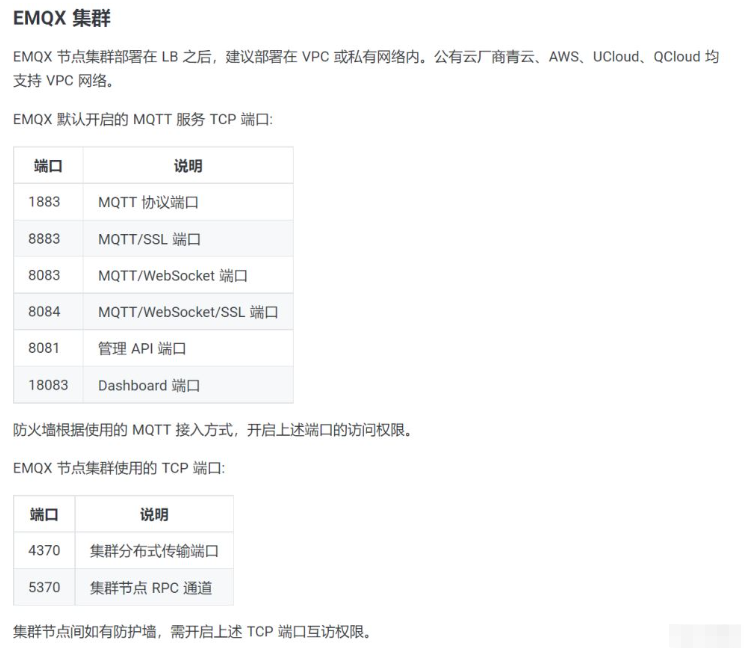
好了, 搭建成功下一步就是我们的java程序要与mqtt连接, 这里有两种方式(其实不止两种)进行连接.
一是 直接使用 MQTT Java 客户端库
二是使用 spring integration mqtt也是比较推荐的一种,也是我们主讲这种.
第一步 添加 maven dependency
            org.springframework.integration
            spring-integration-mqtt
            5.5.14
第二步 添加配置
1 先写好一些基本配置
mqtt:
 username: test                        # 账号
 password: 123456                      # 密码
 host-url: tcp://127.0.0.1:1883        # mqtt连接tcp地址
 in-client-id: ${random.value}         # 随机值,使出入站 client ID 不同
 out-client-id: ${random.value}
 client-id: ${random.int}                   # 客户端Id,不能相同,采用随机数 ${random.value}
 default-topic: test/#,topic/+/+/up         # 默认主题
 timeout: 60                                # 超时时间
 keepalive: 60                              # 保持连接
clearSession: true # 清除会话(设置为false,断开连接,重连后使用原来的会话 保留订阅的主题,能接收离线期间的消息)2.然后写一个对应的类MqttProperties
import org.springframework.beans.factory.annotation.Value;
import org.springframework.stereotype.Component;

/**
 * MqttProperties
 *
 * @author hengzi
 * @date 2022/8/23
 */
@Component
public class MqttProperties {

    /**
     * 用户名
     */
    @Value("${mqtt.username}")
    private String username;

    /**
     * 密码
     */
    @Value("${mqtt.password}")
    private String password;

    /**
     * 连接地址
     */
    @Value("${mqtt.host-url}")
    private String hostUrl;

    /**
     * 进-客户Id
     */
    @Value("${mqtt.in-client-id}")
    private String inClientId;

    /**
     * 出-客户Id
     */
    @Value("${mqtt.out-client-id}")
    private String outClientId;

    /**
     * 客户Id
     */
    @Value("${mqtt.client-id}")
    private String clientId;

    /**
     * 默认连接话题
     */
    @Value("${mqtt.default-topic}")
    private String defaultTopic;

    /**
     * 超时时间
     */
    @Value("${mqtt.timeout}")
    private int timeout;

    /**
     * 保持连接数
     */
    @Value("${mqtt.keepalive}")
    private int keepalive;

    /**是否清除session*/
    @Value("${mqtt.clearSession}")
    private boolean clearSession;

	// ...getter and setter

}
接下来就是配置一些乱七八糟的东西, 这里有很多概念性的东西 比如 管道channel, 适配器 adapter, 入站Inbound, 出站Outbound,等等等等, 看起来是非常头痛的
好吧,那就一个一个来,
首先连接mqtt需要一个客户端, 那么我们就开一个客户端工厂, 这里可以产生很多很多的客户端
    @Bean
    public MqttPahoClientFactory mqttPahoClientFactory(){
        DefaultMqttPahoClientFactory factory = new DefaultMqttPahoClientFactory();
        MqttConnectOptions options = new MqttConnectOptions();
        options.setServerURIs(mqttProperties.getHostUrl().split(","));
        options.setUserName(mqttProperties.getUsername());
        options.setPassword(mqttProperties.getPassword().toCharArray());
        factory.setConnectionOptions(options);
        return factory;
}然后再搞两根管子(channel),一个出站,一个入站
    //出站消息管道,
    @Bean
    public MessageChannel mqttOutboundChannel(){
        return new DirectChannel();
    }

    // 入站消息管道
    @Bean
    public MessageChannel mqttInboundChannel(){
        return new DirectChannel();
    }
为了使这些管子能流通 就需要一个适配器(adapter)
    // Mqtt 管道适配器
    @Bean
    public MqttPahoMessageDrivenChannelAdapter adapter(MqttPahoClientFactory factory){
        return new MqttPahoMessageDrivenChannelAdapter(mqttProperties.getInClientId(),factory,mqttProperties.getDefaultTopic().split(","));
    }
然后定义消息生产者
    // 消息生产者
    @Bean
    public MessageProducer mqttInbound(MqttPahoMessageDrivenChannelAdapter adapter){
        adapter.setCompletionTimeout(5000);
        adapter.setConverter(new DefaultPahoMessageConverter());
        //入站投递的通道
        adapter.setOutputChannel(mqttInboundChannel());
        adapter.setQos(1);
        return adapter;
    }
那我们收到消息去哪里处理呢,答案是这里:
    @Bean
    //使用ServiceActivator 指定接收消息的管道为 mqttInboundChannel,投递到mqttInboundChannel管道中的消息会被该方法接收并执行
    @ServiceActivator(inputChannel = "mqttInboundChannel")
    public MessageHandler handleMessage() {
    	// 这个 mqttMessageHandle 其实就是一个 MessageHandler 的实现类(这个类我放下面)
        return mqttMessageHandle;
		// 你也可以这样写
//        return new MessageHandler() {
//            @Override
//            public void handleMessage(Message message) throws MessagingException {
//                // do something
//            }
//        };
到这里我们其实已经可以接受到来自mqtt的消息了
接下来配置向mqtt发送消息
配置 出站处理器
    // 出站处理器
    @Bean
    @ServiceActivator(inputChannel = "mqttOutboundChannel")
    public MessageHandler mqttOutbound(MqttPahoClientFactory factory){
        MqttPahoMessageHandler handler = new MqttPahoMessageHandler(mqttProperties.getOutClientId(),factory);
        handler.setAsync(true);
        handler.setConverter(new DefaultPahoMessageConverter());
        handler.setDefaultTopic(mqttProperties.getDefaultTopic().split(",")[0]);
        return handler;
    }
这个 出站处理器 在我看来就是让别人 (MqttPahoMessageHandler)处理了, 我就不处理了,我只管我要发送什么,至于怎么发送,由MqttPahoMessageHandler来完成
接下来我们定义一个接口即可
import org.springframework.integration.annotation.MessagingGateway;
import org.springframework.integration.mqtt.support.MqttHeaders;
import org.springframework.messaging.handler.annotation.Header;
import org.springframework.stereotype.Component;

/**
 * MqttGateway
 *
 * @author hengzi
 * @date 2022/8/23
 */

@Component
@MessagingGateway(defaultRequestChannel = "mqttOutboundChannel")
public interface MqttGateway {

    void sendToMqtt(@Header(MqttHeaders.TOPIC) String topic, String data);

    void sendToMqtt(@Header(MqttHeaders.TOPIC) String topic, @Header(MqttHeaders.QOS) Integer Qos, String data);
}
我们直接调用这个接口就可以向mqtt 发送数据
到目前为止,整个配置文件长这样:
import org.eclipse.paho.client.mqttv3.MqttConnectOptions;
import org.springframework.beans.factory.annotation.Autowired;
import org.springframework.context.annotation.Bean;
import org.springframework.context.annotation.Configuration;
import org.springframework.integration.annotation.ServiceActivator;
import org.springframework.integration.channel.DirectChannel;
import org.springframework.integration.core.MessageProducer;
import org.springframework.integration.mqtt.core.DefaultMqttPahoClientFactory;
import org.springframework.integration.mqtt.core.MqttPahoClientFactory;
import org.springframework.integration.mqtt.inbound.MqttPahoMessageDrivenChannelAdapter;
import org.springframework.integration.mqtt.outbound.MqttPahoMessageHandler;
import org.springframework.integration.mqtt.support.DefaultPahoMessageConverter;
import org.springframework.messaging.Message;
import org.springframework.messaging.MessageChannel;
import org.springframework.messaging.MessageHandler;
import org.springframework.messaging.MessagingException;

/**
 * MqttConfig
 *
 * @author hengzi
 * @date 2022/8/23
 */
@Configuration
public class MqttConfig {


    /**
     *  以下属性将在配置文件中读取
     **/
    @Autowired
    private MqttProperties mqttProperties;


    //Mqtt 客户端工厂
    @Bean
    public MqttPahoClientFactory mqttPahoClientFactory(){
        DefaultMqttPahoClientFactory factory = new DefaultMqttPahoClientFactory();
        MqttConnectOptions options = new MqttConnectOptions();
        options.setServerURIs(mqttProperties.getHostUrl().split(","));
        options.setUserName(mqttProperties.getUsername());
        options.setPassword(mqttProperties.getPassword().toCharArray());
        factory.setConnectionOptions(options);
        return factory;
    }

    // Mqtt 管道适配器
    @Bean
    public MqttPahoMessageDrivenChannelAdapter adapter(MqttPahoClientFactory factory){
        return new MqttPahoMessageDrivenChannelAdapter(mqttProperties.getInClientId(),factory,mqttProperties.getDefaultTopic().split(","));
    }


    // 消息生产者
    @Bean
    public MessageProducer mqttInbound(MqttPahoMessageDrivenChannelAdapter adapter){
        adapter.setCompletionTimeout(5000);
        adapter.setConverter(new DefaultPahoMessageConverter());
        //入站投递的通道
        adapter.setOutputChannel(mqttInboundChannel());
        adapter.setQos(1);
        return adapter;
    }


    // 出站处理器
    @Bean
    @ServiceActivator(inputChannel = "mqttOutboundChannel")
    public MessageHandler mqttOutbound(MqttPahoClientFactory factory){
        MqttPahoMessageHandler handler = new MqttPahoMessageHandler(mqttProperties.getOutClientId(),factory);
        handler.setAsync(true);
        handler.setConverter(new DefaultPahoMessageConverter());
        handler.setDefaultTopic(mqttProperties.getDefaultTopic().split(",")[0]);
        return handler;
    }

    @Bean
    //使用ServiceActivator 指定接收消息的管道为 mqttInboundChannel,投递到mqttInboundChannel管道中的消息会被该方法接收并执行
    @ServiceActivator(inputChannel = "mqttInboundChannel")
    public MessageHandler handleMessage() {
        return mqttMessageHandle;
    }

    //出站消息管道,
    @Bean
    public MessageChannel mqttOutboundChannel(){
        return new DirectChannel();
    }


    // 入站消息管道
    @Bean
    public MessageChannel mqttInboundChannel(){
        return new DirectChannel();
    }
}
处理消息的 MqttMessageHandle
@Component
public class MqttMessageHandle implements MessageHandler {
    @Override
    public void handleMessage(Message message) throws MessagingException {

    }
}
在进一步了解之后,发现可以优化的地方,比如channel 的类型是有很多种的, 这里使用的DirectChannel,是Spring Integration默认的消息通道,它将消息发送给为一个订阅者,然后阻碍发送直到消息被接收,传输方式都是同步的方式,都是由一个线程来运行的.
这里我们可以将入站channel改成 ExecutorChannel一个可以使用多线程的channel
@Bean
    public ThreadPoolTaskExecutor mqttThreadPoolTaskExecutor()
    {
        ThreadPoolTaskExecutor executor = new ThreadPoolTaskExecutor();
        // 最大可创建的线程数
        int maxPoolSize = 200;
        executor.setMaxPoolSize(maxPoolSize);
        // 核心线程池大小
        int corePoolSize = 50;
        executor.setCorePoolSize(corePoolSize);
        // 队列最大长度
        int queueCapacity = 1000;
        executor.setQueueCapacity(queueCapacity);
        // 线程池维护线程所允许的空闲时间
        int keepAliveSeconds = 300;
        executor.setKeepAliveSeconds(keepAliveSeconds);
        // 线程池对拒绝任务(无线程可用)的处理策略
        executor.setRejectedExecutionHandler(new ThreadPoolExecutor.CallerRunsPolicy());
        return executor;
    }

    // 入站消息管道
    @Bean
    public MessageChannel mqttInboundChannel(){
        // 用线程池
        return new ExecutorChannel(mqttThreadPoolTaskExecutor());
    }
到这里其实可以运行了.
但是这样配置其实还是有点多, 有点乱, 于是我查找官网, f发现一种更简单的配置方法 叫 Java DSL
我们参考官网,稍微改一下,使用 DSL的方式进行配置:
import org.eclipse.paho.client.mqttv3.MqttConnectOptions;
import org.springframework.beans.factory.annotation.Autowired;
import org.springframework.context.annotation.Bean;
import org.springframework.context.annotation.Configuration;
import org.springframework.integration.channel.ExecutorChannel;
import org.springframework.integration.dsl.IntegrationFlow;
import org.springframework.integration.dsl.IntegrationFlows;
import org.springframework.integration.mqtt.core.DefaultMqttPahoClientFactory;
import org.springframework.integration.mqtt.core.MqttPahoClientFactory;
import org.springframework.integration.mqtt.inbound.MqttPahoMessageDrivenChannelAdapter;
import org.springframework.integration.mqtt.outbound.MqttPahoMessageHandler;
import org.springframework.integration.mqtt.support.DefaultPahoMessageConverter;
import org.springframework.scheduling.concurrent.ThreadPoolTaskExecutor;

import java.util.concurrent.ThreadPoolExecutor;

/**
 * MqttConfigV2
 *
 * @author hengzi
 * @date 2022/8/24
 */
@Configuration
public class MqttConfigV2 {

    @Autowired
    private MqttProperties mqttProperties;

    @Autowired
    private MqttMessageHandle mqttMessageHandle;


    //Mqtt 客户端工厂 所有客户端从这里产生
    @Bean
    public MqttPahoClientFactory mqttPahoClientFactory(){
        DefaultMqttPahoClientFactory factory = new DefaultMqttPahoClientFactory();
        MqttConnectOptions options = new MqttConnectOptions();
        options.setServerURIs(mqttProperties.getHostUrl().split(","));
        options.setUserName(mqttProperties.getUsername());
        options.setPassword(mqttProperties.getPassword().toCharArray());
        factory.setConnectionOptions(options);
        return factory;
    }

    // Mqtt 管道适配器
    @Bean
    public MqttPahoMessageDrivenChannelAdapter adapter(MqttPahoClientFactory factory){
        return new MqttPahoMessageDrivenChannelAdapter(mqttProperties.getInClientId(),factory,mqttProperties.getDefaultTopic().split(","));
    }

    // 消息生产者 (接收,处理来自mqtt的消息)
    @Bean
    public IntegrationFlow mqttInbound(MqttPahoMessageDrivenChannelAdapter adapter) {
        adapter.setCompletionTimeout(5000);
        adapter.setQos(1);
        return IntegrationFlows.from( adapter)
                .channel(new ExecutorChannel(mqttThreadPoolTaskExecutor()))
                .handle(mqttMessageHandle)
                .get();
    }

    @Bean
    public ThreadPoolTaskExecutor mqttThreadPoolTaskExecutor()
    {
        ThreadPoolTaskExecutor executor = new ThreadPoolTaskExecutor();
        // 最大可创建的线程数
        int maxPoolSize = 200;
        executor.setMaxPoolSize(maxPoolSize);
        // 核心线程池大小
        int corePoolSize = 50;
        executor.setCorePoolSize(corePoolSize);
        // 队列最大长度
        int queueCapacity = 1000;
        executor.setQueueCapacity(queueCapacity);
        // 线程池维护线程所允许的空闲时间
        int keepAliveSeconds = 300;
        executor.setKeepAliveSeconds(keepAliveSeconds);
        // 线程池对拒绝任务(无线程可用)的处理策略
        executor.setRejectedExecutionHandler(new ThreadPoolExecutor.CallerRunsPolicy());
        return executor;
    }

    // 出站处理器 (向 mqtt 发送消息)
    @Bean
    public IntegrationFlow mqttOutboundFlow(MqttPahoClientFactory factory) {

        MqttPahoMessageHandler handler = new MqttPahoMessageHandler(mqttProperties.getOutClientId(),factory);
        handler.setAsync(true);
        handler.setConverter(new DefaultPahoMessageConverter());
        handler.setDefaultTopic(mqttProperties.getDefaultTopic().split(",")[0]);
        return IntegrationFlows.from( "mqttOutboundChannel").handle(handler).get();
    }

}
这样看起来真的简单多了, 头也没那么大了, 我要是早知道多好.
好了以上就是配置相关的, 到这里其实是已经完成springboot 与 mqtt 的整合了.
但其实我一直有个想法, 就是我们接收的消息 都是在 handleMessage这个方法里面执行的,
	@Override
    public void handleMessage(Message message) throws MessagingException {

    }
所以我就有了一个想法, 能不能根据 我订阅的主题,在不同的方法执行, 对于这个问题,其实你用if ... else ...也能实现, 但很明显,如果我订阅的主题很多的话, 那写起来就很头痛了.
对于这个问题,有两种思路, 一个是添加Spring Integration的路由 router,根据不同topic路由到不同的channel, 这个我也知道能不能实现, 我这里就不讨论了.
第二种是, 我也不知道名字改如何叫, 我是参考了 spring的 @Controller的设计, 暂且叫他注解模式.
众所周知,我们的接口都是在类上加 @Controller这个注解, 就代表这个类是 http 接口, 再在方法加上 @RequestMapping就能实现不同的 url 调用不同的方法.
参数这个设计 我们在类上面加 @MqttService就代表这个类是专门处理mqtt消息的服务类
同时 在这个类的方法上 加上 @MqttTopic就代表 这个主题由这个方法处理.
OK, 理论有了,接下来就是 实践.
先定义 两个注解
import org.springframework.core.annotation.AliasFor;
import org.springframework.stereotype.Component;

import java.lang.annotation.*;

@Documented
@Target({ElementType.TYPE})
@Retention(RetentionPolicy.RUNTIME)
@Component
public @interface MqttService {

    @AliasFor(
            annotation = Component.class
    )
    String value() default "";
}
加上 @Component注解 spring就会扫描, 并注册到IOC容器里
import java.lang.annotation.ElementType;
import java.lang.annotation.Retention;
import java.lang.annotation.RetentionPolicy;
import java.lang.annotation.Target;

@Target(ElementType.METHOD)
@Retention(RetentionPolicy.RUNTIME)
public @interface MqttTopic {

    /**
     * 主题名字
     */
    String value() default "";

}
参考 @RequestMapping我们使用起来应该是这样的:
import org.slf4j.Logger;
import org.slf4j.LoggerFactory;
import org.springframework.messaging.Message;

/**
 * MqttTopicHandle
 *
 * @author hengzi
 * @date 2022/8/24
 */
@MqttService
public class MqttTopicHandle {

    public static final Logger log = LoggerFactory.getLogger(MqttTopicHandle.class);

	// 这里的 # 号是通配符
    @MqttTopic("test/#")
    public void test(Message message){
        log.info("test="+message.getPayload());
    }

	// 这里的 + 号是通配符
    @MqttTopic("topic/+/+/up")
    public void up(Message message){
        log.info("up="+message.getPayload());
    }

	// 注意 你必须先订阅
    @MqttTopic("topic/1/2/down")
    public void down(Message message){
        log.info("down="+message.getPayload());
    }
}
OK 接下来就是实现这样的使用
分析 :
当我们收到消息时, 我们从IOC容器中 找到所有 带 @MqttService注解的类
然后 遍历这些类, 找到带有 @MqttTopic的方法
接着 把 @MqttTopic注解的的值 与 接受到的topic 进行对比
如果一致则执行这个方法
废话少说, 上代码
import org.slf4j.Logger;
import org.slf4j.LoggerFactory;
import org.springframework.messaging.Message;
import org.springframework.messaging.MessageHandler;
import org.springframework.messaging.MessagingException;
import org.springframework.stereotype.Component;

import java.lang.reflect.InvocationTargetException;
import java.lang.reflect.Method;
import java.util.Map;

/**
 * MessageHandleService
 *
 * @author hengzi
 * @date 2022/8/24
 */
@Component
public class MqttMessageHandle implements MessageHandler {

    public static final Logger log = LoggerFactory.getLogger(MqttMessageHandle.class);

    // 包含 @MqttService注解 的类(Component)
    public static Map mqttServices;


    /**
     * 所有mqtt到达的消息都会在这里处理
     * 要注意这个方法是在线程池里面运行的
     * @param message message
     */
    @Override
    public void handleMessage(Message message) throws MessagingException {
        getMqttTopicService(message);
    }

    public Map getMqttServices(){
        if(mqttServices==null){
            mqttServices = SpringUtils.getBeansByAnnotation(MqttService.class);
        }
        return mqttServices;
    }

    public void getMqttTopicService(Message message){
        // 在这里 我们根据不同的 主题 分发不同的消息
        String receivedTopic = message.getHeaders().get("mqtt_receivedTopic",String.class);
        if(receivedTopic==null || "".equals(receivedTopic)){
            return;
        }
        for(Map.Entry entry : getMqttServices().entrySet()){
        	// 把所有带有 @MqttService 的类遍历
            Class clazz = entry.getValue().getClass();
            // 获取他所有方法
            Method[] methods = clazz.getDeclaredMethods();
            for ( Method method: methods ){
                if (method.isAnnotationPresent(MqttTopic.class)){
                	// 如果这个方法有 这个注解
                    MqttTopic handleTopic = method.getAnnotation(MqttTopic.class);
                    if(isMatch(receivedTopic,handleTopic.value())){
                    	// 并且 这个 topic 匹配成功
                        try {
                            method.invoke(SpringUtils.getBean(clazz),message);
                            return;
                        } catch (IllegalAccessException e) {
                            e.printStackTrace();
                            log.error("代理炸了");
                        } catch (InvocationTargetException e) {
                            log.error("执行 {} 方法出现错误",handleTopic.value(),e);
                        }
                    }
                }
            }
        }
    }


    /**
     * mqtt 订阅的主题与我实际的主题是否匹配
     * @param topic 是实际的主题
     * @param pattern 是我订阅的主题 可以是通配符模式
     * @return 是否匹配
     */
    public static boolean isMatch(String topic, String pattern){

        if((topic==null) || (pattern==null) ){
            return false;
        }

        if(topic.equals(pattern)){
            // 完全相等是肯定匹配的
            return true;
        }

        if("#".equals(pattern)){
            // # 号代表所有主题  肯定匹配的
            return true;
        }
        String[] splitTopic = topic.split("/");
        String[] splitPattern = pattern.split("/");

        boolean match = true;

        // 如果包含 # 则只需要判断 # 前面的
        for (int i = 0; i < splitPattern.length; i++) {
            if(!"#".equals(splitPattern[i])){
                // 不是# 号 正常判断
                if(i>=splitTopic.length){
                    // 此时长度不相等 不匹配
                    match = false;
                    break;
                }
                if(!splitTopic[i].equals(splitPattern[i]) && !"+".equals(splitPattern[i])){
                    // 不相等 且不等于 +
                    match = false;
                    break;
                }
            }
            else {
                // 是# 号  肯定匹配的
                break;
            }
        }

        return match;
    }

}
工具类 SpringUtils
import org.springframework.aop.framework.AopContext;
import org.springframework.beans.BeansException;
import org.springframework.beans.factory.NoSuchBeanDefinitionException;
import org.springframework.beans.factory.config.BeanFactoryPostProcessor;
import org.springframework.beans.factory.config.ConfigurableListableBeanFactory;
import org.springframework.context.ApplicationContext;
import org.springframework.context.ApplicationContextAware;
import org.springframework.stereotype.Component;

import java.util.Map;

/**
 * spring工具类 方便在非spring管理环境中获取bean
 *
 */
@Component
public final class SpringUtils implements BeanFactoryPostProcessor, ApplicationContextAware
{
    /** Spring应用上下文环境 */
    private static ConfigurableListableBeanFactory beanFactory;

    private static ApplicationContext applicationContext;


    public static Map getBeansByAnnotation(Class clsName) throws BeansException{

        return beanFactory.getBeansWithAnnotation(clsName);
    }

    @Override
    public void postProcessBeanFactory(ConfigurableListableBeanFactory beanFactory) throws BeansException
    {
        SpringUtils.beanFactory = beanFactory;
    }

    @Override
    public void setApplicationContext(ApplicationContext applicationContext) throws BeansException
    {
        SpringUtils.applicationContext = applicationContext;
    }

    /**
     * 获取对象
     *
     * @param name
     * @return Object 一个以所给名字注册的bean的实例
     * @throws org.springframework.beans.BeansException
     *
     */
    @SuppressWarnings("unchecked")
    public static  T getBean(String name) throws BeansException
    {
        return (T) beanFactory.getBean(name);
    }

    /**
     * 获取类型为requiredType的对象
     *
     * @param clz
     * @return
     * @throws org.springframework.beans.BeansException
     *
     */
    public static  T getBean(Class clz) throws BeansException
    {
        T result = (T) beanFactory.getBean(clz);
        return result;
    }

    /**
     * 如果BeanFactory包含一个与所给名称匹配的bean定义,则返回true
     *
     * @param name
     * @return boolean
     */
    public static boolean containsBean(String name)
    {
        return beanFactory.containsBean(name);
    }

    /**
     * 判断以给定名字注册的bean定义是一个singleton还是一个prototype。 如果与给定名字相应的bean定义没有被找到,将会抛出一个异常(NoSuchBeanDefinitionException)
     *
     * @param name
     * @return boolean
     * @throws org.springframework.beans.factory.NoSuchBeanDefinitionException
     *
     */
    public static boolean isSingleton(String name) throws NoSuchBeanDefinitionException
    {
        return beanFactory.isSingleton(name);
    }

    /**
     * @param name
     * @return Class 注册对象的类型
     * @throws org.springframework.beans.factory.NoSuchBeanDefinitionException
     *
     */
    public static Class getType(String name) throws NoSuchBeanDefinitionException
    {
        return beanFactory.getType(name);
    }

    /**
     * 如果给定的bean名字在bean定义中有别名,则返回这些别名
     *
     * @param name
     * @return
     * @throws org.springframework.beans.factory.NoSuchBeanDefinitionException
     *
     */
    public static String[] getAliases(String name) throws NoSuchBeanDefinitionException
    {
        return beanFactory.getAliases(name);
    }

    /**
     * 获取aop代理对象
     *
     * @param invoker
     * @return
     */
    @SuppressWarnings("unchecked")
    public static  T getAopProxy(T invoker)
    {
        return (T) AopContext.currentProxy();
    }

    /**
     * 获取当前的环境配置,无配置返回null
     *
     * @return 当前的环境配置
     */
    public static String[] getActiveProfiles()
    {
        return applicationContext.getEnvironment().getActiveProfiles();
    }

}
OK, 大功告成. 终于舒服了, 终于不用写if...else...了, 个人感觉这样处理起来会更加优雅. 写代码最重要是什么, 是优雅~
以上!
参考文章:
使用 Spring integration 在Springboot中集成Mqtt
Spring Integration(一)概述
附:
动态添加主题方式:
import org.springframework.beans.factory.annotation.Autowired;
import org.springframework.integration.mqtt.inbound.MqttPahoMessageDrivenChannelAdapter;
import org.springframework.stereotype.Service;

import java.util.Arrays;

/**
 * MqttService
 *
 * @author hengzi
 * @date 2022/8/25
 */
@Service
public class MqttService {

    @Autowired
    private MqttPahoMessageDrivenChannelAdapter adapter;


    public void addTopic(String topic) {
        addTopic(topic, 1);
    }

    public void addTopic(String topic,int qos) {
        String[] topics = adapter.getTopic();
        if(!Arrays.asList(topics).contains(topic)){
            adapter.addTopic(topic,qos);
        }
    }

    public void removeTopic(String topic) {
        adapter.removeTopic(topic);
    }

}
直接调用就行





Postman是一套面向API全生命周期的开发与测试平台,可在Mac上发送和调试多种协议请求,管理集合、环境及认证信息,并完成脚本测试、模拟服务、监控、文档发布和团队协作。它适合开发、测试及运维人员使用,提供个人免费方案。

Docker Desktop 是 Docker 官方为 Mac 提供的容器开发环境,集成 Docker Engine、命令行工具、Compose、Build、Kubernetes 与图形化管理界面。

Android Studio 是 Google 面向安卓应用开发提供的官方集成开发环境,基于 IntelliJ IDEA 构建。它整合智能代码编辑、Gradle 构建、界面预览、设备模拟、性能分析、调试测试及 APK 分析等工具。

Xcode 是苹果面向 Mac 提供的官方集成开发环境,将代码编辑、项目构建、SwiftUI 实时预览、设备模拟、自动化测试、断点调试、性能分析和应用分发整合在同一套工作流中,适合开发与维护 iPhone、iPad、Mac、Apple Wa

JetBrains WebStorm 是面向 JavaScript、TypeScript 和现代 Web 技术的专业集成开发环境,可智能理解项目结构,提供代码补全、重构、错误检查、运行调试、测试及 Git 工具。

PhpStorm 是 JetBrains 推出的专业 PHP 集成开发环境,可在 Mac 上完成代码编写、智能检查、重构、调试、测试和数据库管理。它支持主流 PHP 框架、Composer、Git、Docker 与远程解释器。

JetBrains PyCharm 是面向 Python 开发者的集成开发环境,提供智能补全、代码检查、重构、调试、测试、版本控制及虚拟环境管理功能。Mac 版兼容 Intel 与 Apple 芯片,核心功能可免费使用。

IntelliJ IDEA 是 JetBrains 推出的专业集成开发环境,重点服务于 Java、Kotlin 与 JVM 项目开发。软件集成代码补全、静态检查、重构、调试、测试、版本控制及构建工具,并可借助插件扩展语言和框架支持。

Visual Studio Code 是微软提供的免费代码编辑器,支持 macOS,并为 Intel 与 Apple 芯片 Mac 提供适配版本。软件集代码编辑、调试、Git 源代码管理、集成终端和扩展市场于一体。

REAPER是Cockos开发的数字音频工作站,提供多轨音频与MIDI录制、剪辑、处理、混音和母带制作工具。Mac版兼容Intel与Apple芯片,支持AU、VST、VST3、CLAP等插件格式,并提供高度可定制的工作流程。

Adobe Audition 是面向播客、影视后期、音乐制作及内容创作者的专业音频工作站,提供波形精修、多轨录制与混音、频谱编辑、降噪修复、响度匹配和效果处理工具,并可与 Adobe Premiere 协同完成视频声音制作。

Pro Tools 是 Avid 推出的专业数字音频工作站,覆盖多轨录音、无损剪辑、MIDI 编曲、插件处理、自动化混音及声音与画面同步等工作。它拥有 Intro、Artist、Studio 和 Ultimate 等方案。

PixPix 是面向品牌、卖家和内容团队的在线 AI 图片视频创作平台,提供图视频 Agent、无限画布、图片生成、视频生成、自然语言编辑及商品套图、产品精修和带货视频等电商工具。

Postman 是面向 API 全生命周期的开发与协作平台。Windows 桌面版可用于构建和发送 HTTP、GraphQL、gRPC、WebSocket、MQTT 等请求,并提供环境变量、集合、脚本测试、模拟服务、监控、文档及团队工作区等

Docker Desktop 为 Windows 开发者提供集成式容器环境,内置 Docker Engine、命令行工具、Compose、Build 与 Kubernetes 等组件,可在本机完成镜像构建、容器运行、日志查看和资源管理。

Android Studio 是 Google 面向 Android 应用开发提供的官方集成开发环境,以 IntelliJ IDEA 为基础,集成智能代码编辑、Gradle 构建、设备模拟、界面预览、调试测试及性能分析工具,

WebStorm 是 JetBrains 面向 JavaScript、TypeScript 和现代 Web 技术打造的集成开发环境。它提供项目级代码分析、智能补全、安全重构、导航搜索,并集成调试、测试、终端、Git 与常用前端工具,

PhpStorm 是 JetBrains 面向 PHP 与现代 Web 开发打造的专业集成开发环境,提供代码补全、静态检查、重构、调试、测试、数据库、版本控制及前端语言支持。Windows 用户可直接下载安装程序,

PyCharm 是 JetBrains 推出的 Python 集成开发环境,提供智能代码补全、错误检查、重构、调试、测试、Git、终端及 Jupyter Notebook 支持。统一版安装后可体验 30 天 Pro 功能,

JetBrains IntelliJ IDEA 是以 Java、Kotlin 和 JVM 项目为核心的专业集成开发环境,提供智能补全、代码检查、安全重构、调试、测试、版本控制及构建工具集成。统一发行版的核心功能可免费用于商业和非商业项目,

Visual Studio Code 是微软推出的免费代码编辑器,Windows 版集成智能补全、代码导航、调试、终端和版本控制,并可通过扩展添加语言、格式化及远程开发能力。它启动较快、配置灵活,

REAPER 是 Cockos 推出的数字音频工作站,适用于录音、MIDI 编曲、音频编辑、混音、母带制作及声音设计。软件安装包小巧,支持多轨录制、灵活路由、自动化、第三方插件和脚本扩展,并提供完整功能的 60 天免费评估期。

Adobe Audition 是面向播客、影视后期、广播与音乐制作的专业音频工作站,提供波形编辑、多轨混音、频谱分析、录音、降噪修复和效果处理等功能。Windows 版通过 Adobe Creative Cloud 安装和管理,

Pro Tools 是 Avid 推出的专业数字音频工作站,提供多轨录音、音频剪辑、MIDI编曲、插件处理、自动化混音及影视声音制作能力。它适合音乐人、录音师、制作人和音频后期团队使用,并提供免费入门版、订阅方案及永久授权选择。