


从头开始实现一种稀疏混合专家体系的语言模型(MoE),并亲自指导你
本文介绍了实现一个稀疏混合专家语言模型(MoE)的方法,详细解释了模型的实施过程,包括采用稀疏混合专家取代传统的前馈神经网络,实现top-k门控和带噪声的top-k门控,以及采用KaimingHe初始化技术。作者还说明了从makemore架构保持不变的元素,比如数据集处理、分词预处理和语言建模任务。最后还提供了一个GitHub仓库链接,用于实现模型的整个过程,是一本不可多得的实战教科书。内容简介混合专家模型(MoE)在发布后开始受到广泛关注,特别是在稀疏化的混合专家语言模型中。虽然大部分组件与传统的tra
本文介绍了实现一个稀疏混合专家语言模型(MoE)的方法,详细解释了模型的实施过程,包括采用稀疏混合专家取代传统的前馈神经网络,实现 top-k 门控和带噪声的 top-k 门控,以及采用 Kaiming He 初始化技术。作者还说明了从 makemore 架构保持不变的元素,比如数据集处理、分词预处理和语言建模任务。最后还提供了一个 GitHub 仓库链接,用于实现模型的整个过程,是一本不可多得的实战教科书。
内容简介
混合专家模型(MoE)在发布后开始受到广泛关注,特别是在稀疏化的混合专家语言模型中。虽然大部分组件与传统的transformers相似,但稀疏混合专家语言模型的训练稳定性存在一些问题,尽管看上去相对简单。
这种可配置的小规模稀疏 MoE 实施方法在Hugging Face的一篇博客中被介绍了出来,这对于想要进行新方法快速试验的研究者来说可能非常有帮助。博客还提供了基于PyTorch的详细代码,可以在此链接找到:https://github.com/AviSoori1x/makeMoE/tree/main。这样的小规模实现有助于研究者们在这个领域进行快速试验。
本站对此进行了整理,以飨读者。
本文在 makemore 架构的基础上,进行了几处更改:
使用稀疏混合专家代替单独的前馈神经网络;
Top-k 门控和有噪声的 Top-k 门控;
参数初始化使用了 Kaiming He 初始化方法,但本文重点是可自定义初始化方法,包括选择 Xavier/Glorot 等初始化方法。
同时,以下模块与 makemore 保持一致:
数据集、预处理(分词)部分以及 Andrej 最初选择的语言建模任务 - 生成莎士比亚文风的文本内容
Casusal 自注意力机制
训练循环
推理逻辑
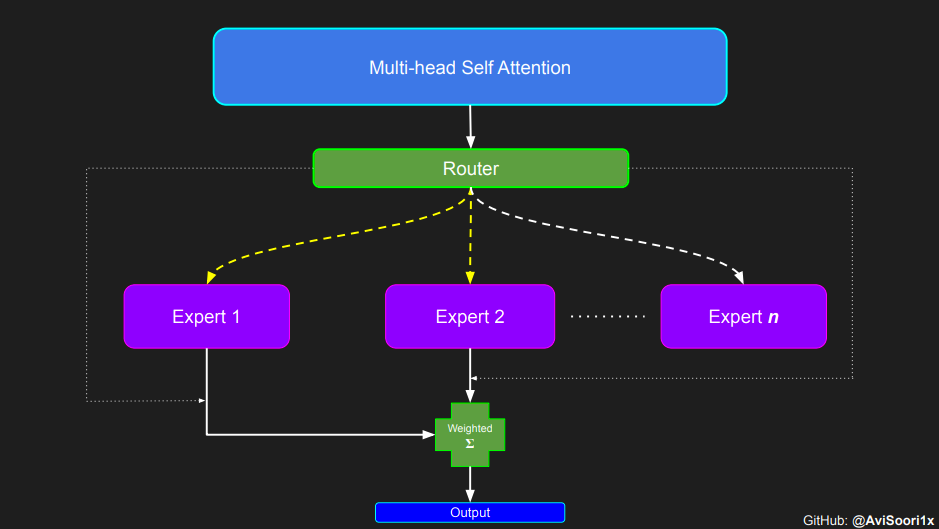
接下来逐步介绍实施方案,先从注意力机制开始。
因果缩放点积注意力机制
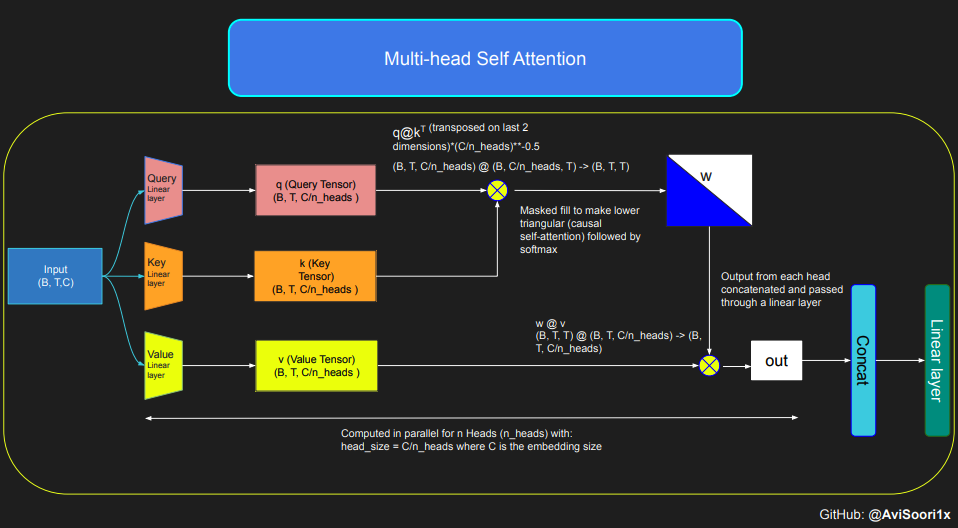
下面这段代码展示了自注意力机制的基本概念,并且侧重于使用经典的缩放点积自注意力(scaled dot product self-attention.)实现。在这一自注意力变体机制中,查询矩阵、键矩阵和值矩阵都来自相同的输入序列。同时为了确保自回归语言生成过程的完整性,特别是在纯解码器模型中,使用了一种掩码机制。
这种掩码机制非常关键,因为它可以掩盖当前 token 所处位置之后的任何信息,从而引导模型只关注序列的前面部分。这种了遮挡 token 后面内容的注意力被称为因果自注意力。值得注意的是,稀疏混合专家模型并不局限于仅有解码器的 Transformer 架构。事实上,这一领域的许多重要的成果都是围绕 T5 架构展开的,T5 架构也包含了 Transformer 模型中的编码器和解码器组件。
#This code is borrowed from Andrej Karpathy's makemore repository linked in the repo.The self attention layers in Sparse mixture of experts models are the same asin regular transformer modelstorch.manual_seed(1337)B,T,C = 4,8,32 # batch, time, channelsx = torch.randn(B,T,C)# let's see a single Head perform self-attentionhead_size = 16key = nn.Linear(C, head_size, bias=False)query = nn.Linear(C, head_size, bias=False)value = nn.Linear(C, head_size, bias=False)k = key(x) # (B, T, 16)q = query(x) # (B, T, 16)wei =q @ k.transpose(-2, -1) # (B, T, 16) @ (B, 16, T) ---> (B, T, T)tril = torch.tril(torch.ones(T, T))#wei = torch.zeros((T,T))wei = wei.masked_fill(tril == 0, float('-inf'))wei = F.softmax(wei, dim=-1) #B,T,Tv = value(x) #B,T,Hout = wei @ v # (B,T,T) @ (B,T,H) -> (B,T,H)out.shapetorch.Size([4, 8, 16])
然后,因果自注意力和多头因果自注意力的代码可整理如下。多头自注意力并行应用多个注意力头,每个注意力头单独关注通道的一个部分(嵌入维度)。多头自注意力从本质上改善了学习过程,并由于其固有的并行能力提高了模型训练的效率。下面这段代码使用了 dropout 来进行正则化,来防止过拟合。
#Causal scaled dot product self-Attention Headn_embd = 64n_head = 4n_layer = 4head_size = 16dropout = 0.1class Head(nn.Module):""" one head of self-attention """def __init__(self, head_size):super().__init__()self.key = nn.Linear(n_embd, head_size, bias=False)self.query = nn.Linear(n_embd, head_size, bias=False)self.value = nn.Linear(n_embd, head_size, bias=False)self.register_buffer('tril', torch.tril(torch.ones(block_size, block_size)))self.dropout = nn.Dropout(dropout)def forward(self, x):B,T,C = x.shapek = self.key(x) # (B,T,C)q = self.query(x) # (B,T,C)# compute attention scores ("affinities")wei = q @ k.transpose(-2,-1) * C**-0.5 # (B, T, C) @ (B, C, T) -> (B, T, T)wei = wei.masked_fill(self.tril[:T, :T] == 0, float('-inf')) # (B, T, T)wei = F.softmax(wei, dim=-1) # (B, T, T)wei = self.dropout(wei)# perform the weighted aggregation of the valuesv = self.value(x) # (B,T,C)out = wei @ v # (B, T, T) @ (B, T, C) -> (B, T, C) return out多头自注意力的实现方式如下:
#Multi-Headed Self Attentionclass MultiHeadAttention(nn.Module):""" multiple heads of self-attention in parallel """def __init__(self, num_heads, head_size):super().__init__()self.heads = nn.ModuleList([Head(head_size) for _ in range(num_heads)])self.proj = nn.Linear(n_embd, n_embd)self.dropout = nn.Dropout(dropout)def forward(self, x):out = torch.cat([h(x) for h in self.heads], dim=-1)out = self.dropout(self.proj(out)) return out
创建一个专家模块
即一个简单的多层感知器
在稀疏混合专家架构中,每个 transformer 区块内的自注意力机制保持不变。不过,每个区块的结构发生了巨大的变化:标准的前馈神经网络被多个稀疏激活的前馈网络(即专家网络)所取代。所谓「稀疏激活」,是指序列中的每个 token 只被分配给有限数量的专家(通常是一个或两个)。
这有助于提高训练和推理速度,因为每次前向传递都会激活少数专家。不过,所有专家都必须存在 GPU 内存中,因此当参数总数达到数千亿甚至数万亿时,就会产生部署方面的问题。
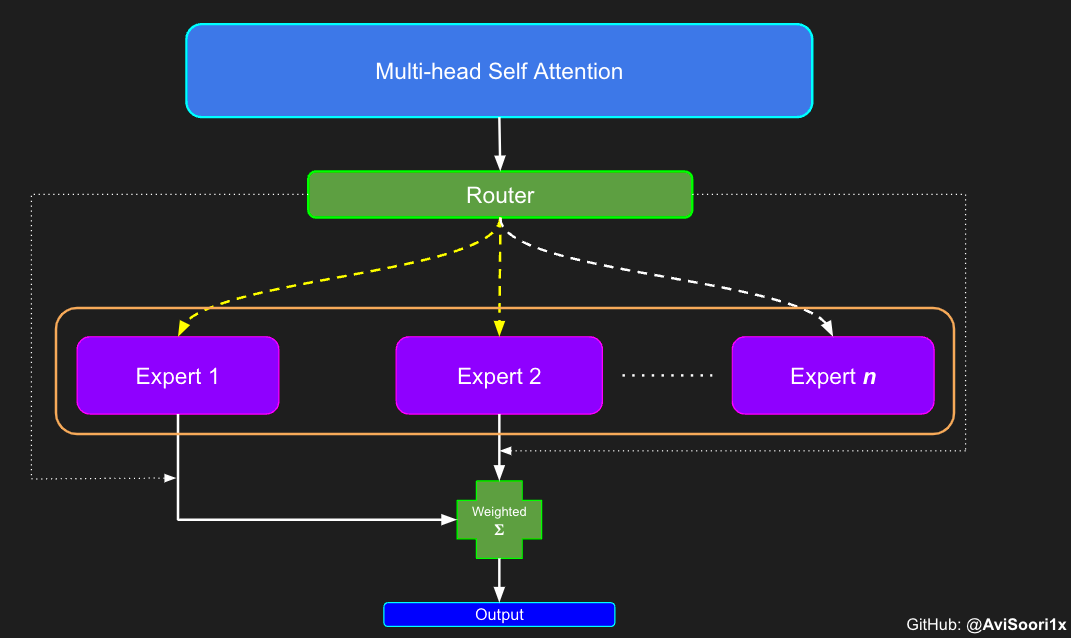
#Expert moduleclass Expert(nn.Module):""" An MLP is a simple linear layer followed by a non-linearity i.e. each Expert """def __init__(self, n_embd):super().__init__()self.net = nn.Sequential(nn.Linear(n_embd, 4 * n_embd),nn.ReLU(),nn.Linear(4 * n_embd, n_embd),nn.Dropout(dropout),)def forward(self, x): return self.net(x)
Top-k 门控的一个例子
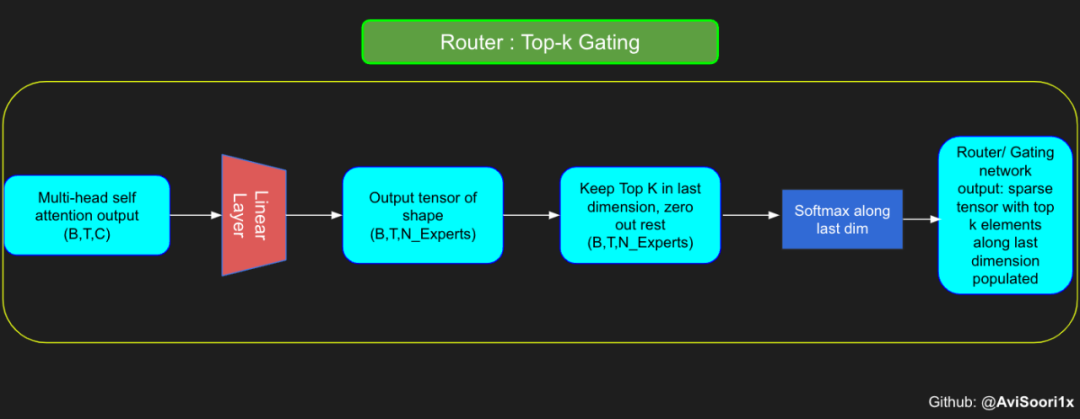
门控网络,也称为路由,确定哪个专家网络接收来自多头注意力的 token 的输出。举个例子解释路由的机制,假设有 4 个专家,token 需要被路由到前 2 个专家中。首先需要通过线性层将 token 输入到门控网络中。该层将对应于(Batch size,Tokens,n_embed)的输入张量从(2,4,32)维度,投影到对应于(Batch size、Tokens,num_expert)的新形状:(2、4,4)。其中 n_embed 是输入的通道维度,num_experts 是专家网络的计数。
接下来,沿最后一个维度,找出最大的前两个值及其相应的索引。
#Understanding how gating worksnum_experts = 4top_k=2n_embed=32#Example multi-head attention output for a simple illustrative example, consider n_embed=32, context_length=4 and batch_size=2mh_output = torch.randn(2, 4, n_embed)topkgate_linear = nn.Linear(n_embed, num_experts) # nn.Linear(32, 4)logits = topkgate_linear(mh_output)top_k_logits, top_k_indices = logits.topk(top_k, dim=-1)# Get top-k expertstop_k_logits, top_k_indices
#output:(tensor([[[ 0.0246, -0.0190],[ 0.1991,0.1513],[ 0.9749,0.7185],[ 0.4406, -0.8357]], [[ 0.6206, -0.0503],[ 0.8635,0.3784],[ 0.6828,0.5972],[ 0.4743,0.3420]]], grad_fn=), tensor([[[2, 3],[2, 1],[3, 1],[2, 1]], [[0, 2], [0, 3], [3, 2], [3, 0]]]))
通过仅保留沿最后一个维度进行比较的前 k 大的值,来获得稀疏门控的输出。用负无穷值填充其余部分,在使用 softmax 激活函数。负无穷会被映射至零,而最大的前两个值会更加突出,且和为 1。要求和为 1 是为了对专家输出的内容进行加权。
zeros = torch.full_like(logits, float('-inf')) #full_like clones a tensor and fills it with a specified value (like infinity) for masking or calculations.sparse_logits = zeros.scatter(-1, top_k_indices, top_k_logits)sparse_logits#outputtensor([[[ -inf,-inf,0.0246, -0.0190], [ -inf,0.1513,0.1991,-inf], [ -inf,0.7185,-inf,0.9749], [ -inf, -0.8357,0.4406,-inf]],[[ 0.6206,-inf, -0.0503,-inf], [ 0.8635,-inf,-inf,0.3784], [ -inf,-inf,0.5972,0.6828], [ 0.3420,-inf,-inf,0.4743]]], grad_fn=)
gating_output= F.softmax(sparse_logits, dim=-1)gating_output
#ouputtensor([[[0.0000, 0.0000, 0.5109, 0.4891], [0.0000, 0.4881, 0.5119, 0.0000], [0.0000, 0.4362, 0.0000, 0.5638], [0.0000, 0.2182, 0.7818, 0.0000]],[[0.6617, 0.0000, 0.3383, 0.0000], [0.6190, 0.0000, 0.0000, 0.3810], [0.0000, 0.0000, 0.4786, 0.5214], [0.4670, 0.0000, 0.0000, 0.5330]]], grad_fn=)
使用有噪声的 top-k 门控以实现负载平衡
# First define the top k router moduleclass TopkRouter(nn.Module):def __init__(self, n_embed, num_experts, top_k):super(TopkRouter, self).__init__()self.top_k = top_kself.linear =nn.Linear(n_embed, num_experts) def forward(self, mh_ouput):# mh_ouput is the output tensor from multihead self attention blocklogits = self.linear(mh_output)top_k_logits, indices = logits.topk(self.top_k, dim=-1)zeros = torch.full_like(logits, float('-inf'))sparse_logits = zeros.scatter(-1, indices, top_k_logits)router_output = F.softmax(sparse_logits, dim=-1) return router_output, indices接下来使用下面这段代码来测试程序:
#Testing this out:num_experts = 4top_k = 2n_embd = 32mh_output = torch.randn(2, 4, n_embd)# Example inputtop_k_gate = TopkRouter(n_embd, num_experts, top_k)gating_output, indices = top_k_gate(mh_output)gating_output.shape, gating_output, indices#And it works!!
#output(torch.Size([2, 4, 4]), tensor([[[0.5284, 0.0000, 0.4716, 0.0000],[0.0000, 0.4592, 0.0000, 0.5408],[0.0000, 0.3529, 0.0000, 0.6471],[0.3948, 0.0000, 0.0000, 0.6052]], [[0.0000, 0.5950, 0.4050, 0.0000], [0.4456, 0.0000, 0.5544, 0.0000], [0.7208, 0.0000, 0.0000, 0.2792], [0.0000, 0.0000, 0.5659, 0.4341]]], grad_fn=), tensor([[[0, 2],[3, 1],[3, 1],[3, 0]], [[1, 2], [2, 0], [0, 3], [2, 3]]]))
尽管最近发布的 mixtral 的论文没有提到这一点,但本文的作者相信有噪声的 Top-k 门控机制是训练 MoE 模型的一个重要工具。从本质上讲,不会希望所有的 token 都发送给同一组「受欢迎」的专家网络。人们需要的是能在开发和探索之间取得良好平衡。为此,为了负载平衡,从门控的线性层向 logits 激活函数添加标准正态噪声是有帮助的,这使训练更有效率。
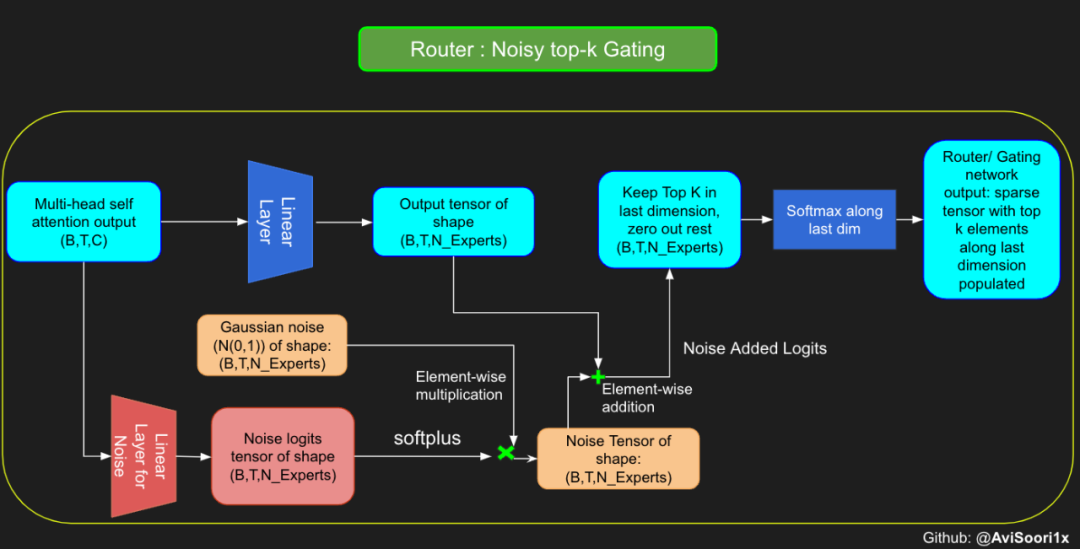
#Changing the above to accomodate noisy top-k gatingclass NoisyTopkRouter(nn.Module):def __init__(self, n_embed, num_experts, top_k):super(NoisyTopkRouter, self).__init__()self.top_k = top_k#layer for router logitsself.topkroute_linear = nn.Linear(n_embed, num_experts)self.noise_linear =nn.Linear(n_embed, num_experts)def forward(self, mh_output):# mh_ouput is the output tensor from multihead self attention blocklogits = self.topkroute_linear(mh_output)#Noise logitsnoise_logits = self.noise_linear(mh_output)#Adding scaled unit gaussian noise to the logitsnoise = torch.randn_like(logits)*F.softplus(noise_logits)noisy_logits = logits + noisetop_k_logits, indices = noisy_logits.topk(self.top_k, dim=-1)zeros = torch.full_like(noisy_logits, float('-inf'))sparse_logits = zeros.scatter(-1, indices, top_k_logits)router_output = F.softmax(sparse_logits, dim=-1) return router_output, indices再次尝试代码:
#Testing this out, again:num_experts = 8top_k = 2n_embd = 16mh_output = torch.randn(2, 4, n_embd)# Example inputnoisy_top_k_gate = NoisyTopkRouter(n_embd, num_experts, top_k)gating_output, indices = noisy_top_k_gate(mh_output)gating_output.shape, gating_output, indices#It works!!
#output(torch.Size([2, 4, 8]), tensor([[[0.4181, 0.0000, 0.5819, 0.0000, 0.0000, 0.0000, 0.0000, 0.0000],[0.4693, 0.5307, 0.0000, 0.0000, 0.0000, 0.0000, 0.0000, 0.0000],[0.0000, 0.4985, 0.5015, 0.0000, 0.0000, 0.0000, 0.0000, 0.0000],[0.0000, 0.0000, 0.0000, 0.2641, 0.0000, 0.7359, 0.0000, 0.0000]], [[0.0000, 0.0000, 0.0000, 0.6301, 0.0000, 0.3699, 0.0000, 0.0000], [0.0000, 0.0000, 0.0000, 0.4766, 0.0000, 0.0000, 0.0000, 0.5234], [0.0000, 0.0000, 0.0000, 0.6815, 0.0000, 0.0000, 0.3185, 0.0000], [0.4482, 0.5518, 0.0000, 0.0000, 0.0000, 0.0000, 0.0000, 0.0000]]], grad_fn=), tensor([[[2, 0],[1, 0],[2, 1],[5, 3]], [[3, 5], [7, 3], [3, 6], [1, 0]]]))
创建稀疏化的混合专家模块
在获得门控网络的输出结果之后,对于给定的 token,将前 k 个值选择性地与来自相应的前 k 个专家的输出相乘。这种选择性乘法的结果是一个加权和,该加权和构成 SparseMoe 模块的输出。这个过程的关键和难点是避免不必要的乘法运算,只为前 k 名专家进行正向转播。为每个专家执行前向传播将破坏使用稀疏 MoE 的目的,因为这个过程将不再是稀疏的。
class SparseMoE(nn.Module):def __init__(self, n_embed, num_experts, top_k):super(SparseMoE, self).__init__()self.router = NoisyTopkRouter(n_embed, num_experts, top_k)self.experts = nn.ModuleList([Expert(n_embed) for _ in range(num_experts)])self.top_k = top_kdef forward(self, x):gating_output, indices = self.router(x)final_output = torch.zeros_like(x)# Reshape inputs for batch processingflat_x = x.view(-1, x.size(-1))flat_gating_output = gating_output.view(-1, gating_output.size(-1))# Process each expert in parallelfor i, expert in enumerate(self.experts):# Create a mask for the inputs where the current expert is in top-kexpert_mask = (indices == i).any(dim=-1)flat_mask = expert_mask.view(-1)if flat_mask.any():expert_input = flat_x[flat_mask]expert_output = expert(expert_input)# Extract and apply gating scoresgating_scores = flat_gating_output[flat_mask, i].unsqueeze(1)weighted_output = expert_output * gating_scores# Update final output additively by indexing and addingfinal_output[expert_mask] += weighted_output.squeeze(1) return final_output
运行以下代码来用样本测试上述实现,可以看到确实如此!
import torchimport torch.nn as nn#Let's test this outnum_experts = 8top_k = 2n_embd = 16dropout=0.1mh_output = torch.randn(4, 8, n_embd)# Example multi-head attention outputsparse_moe = SparseMoE(n_embd, num_experts, top_k)final_output = sparse_moe(mh_output)print("Shape of the final output:", final_output.shape)Shape of the final output: torch.Size([4, 8, 16])
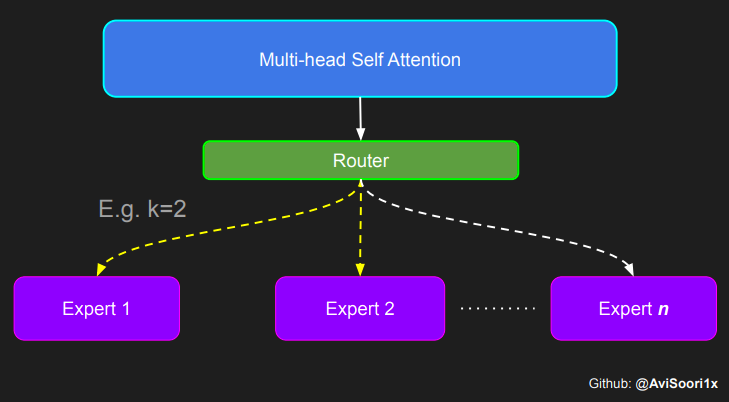
需要强调的是,如上代码所示,从路由 / 门控网络输出的 top_k 本身也很重要。索引确定了被激活的专家是哪些, 对应的值又决定了权重大小。下图进一步解释了加权求和的概念。
模块整合
将多头自注意力和稀疏混合专家相结合,形成稀疏混合专家 transformer 块。就像在 vanilla transformer 块中一样,也要使用残差以确保训练稳定,并避免梯度消失等问题。此外,要采用层归一化来进一步稳定学习过程。
#Create a self attention + mixture of experts block, that may be repeated several number of timesclass Block(nn.Module):""" Mixture of Experts Transformer block: communication followed by computation (multi-head self attention + SparseMoE) """def __init__(self, n_embed, n_head, num_experts, top_k):# n_embed: embedding dimension, n_head: the number of heads we'd likesuper().__init__()head_size = n_embed // n_headself.sa = MultiHeadAttention(n_head, head_size)self.smoe = SparseMoE(n_embed, num_experts, top_k)self.ln1 = nn.LayerNorm(n_embed)self.ln2 = nn.LayerNorm(n_embed)def forward(self, x):x = x + self.sa(self.ln1(x))x = x + self.smoe(self.ln2(x)) return x
最后,将所有内容整合在一起,形成稀疏混合专家语言模型。
class SparseMoELanguageModel(nn.Module):def __init__(self):super().__init__()# each token directly reads off the logits for the next token from a lookup table self.token_embedding_table = nn.Embedding(vocab_size, n_embed) self.position_embedding_table = nn.Embedding(block_size, n_embed)self.blocks = nn.Sequential(*[Block(n_embed, n_head=n_head, num_experts=num_experts,top_k=top_k) for _ in range(n_layer)])self.ln_f = nn.LayerNorm(n_embed) # final layer normself.lm_head = nn.Linear(n_embed, vocab_size)def forward(self, idx, targets=None):B, T = idx.shape# idx and targets are both (B,T) tensor of integerstok_emb = self.token_embedding_table(idx) # (B,T,C)pos_emb = self.position_embedding_table(torch.arange(T, device=device)) # (T,C)x = tok_emb + pos_emb # (B,T,C)x = self.blocks(x) # (B,T,C)x = self.ln_f(x) # (B,T,C)logits = self.lm_head(x) # (B,T,vocab_size)if targets is None:loss = Noneelse:B, T, C = logits.shapelogits = logits.view(B*T, C)targets = targets.view(B*T)loss = F.cross_entropy(logits, targets)return logits, lossdef generate(self, idx, max_new_tokens):# idx is (B, T) array of indices in the current contextfor _ in range(max_new_tokens):# crop idx to the last block_size tokensidx_cond = idx[:, -block_size:]# get the predictionslogits, loss = self(idx_cond)# focus only on the last time steplogits = logits[:, -1, :] # becomes (B, C)# apply softmax to get probabilitiesprobs = F.softmax(logits, dim=-1) # (B, C)# sample from the distributionidx_next = torch.multinomial(probs, num_samples=1) # (B, 1)# append sampled index to the running sequenceidx = torch.cat((idx, idx_next), dim=1) # (B, T+1) return idx
参数初始化对于深度神经网络的高效训练非常重要。由于专家中存在 ReLU 激活,因此这里使用了 Kaiming He 初始化。也可以尝试在 transformer 中更常用的 Glorot 初始化。杰里米 - 霍华德(Jeremy Howard)的《Fastai》第 2 部分有一个从头开始实现这些功能的精彩讲座:https://course.fast.ai/Lessons/lesson17.html
Glorot 参数初始化通常被用于 transformer 模型,因此这是一个可能提高模型性能的方法。
def kaiming_init_weights(m):if isinstance (m, (nn.Linear)): init.kaiming_normal_(m.weight)model = SparseMoELanguageModel()model.apply(kaiming_init_weights)
本文作者使用 mlflow 跟踪并记录重要指标和训练超参数。
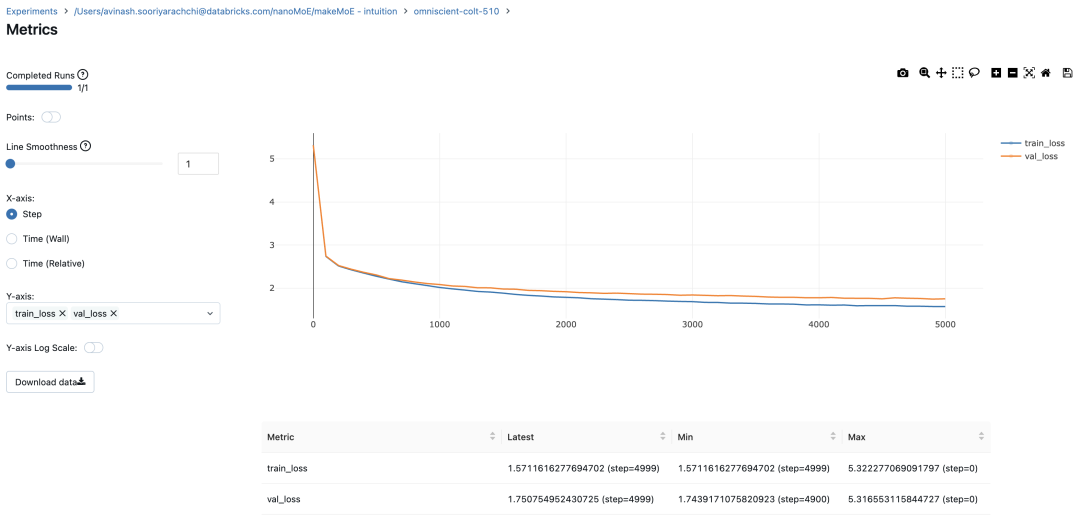
#Using MLFlowm = model.to(device)# print the number of parameters in the modelprint(sum(p.numel() for p in m.parameters())/1e6, 'M parameters')# create a PyTorch optimizeroptimizer = torch.optim.AdamW(model.parameters(), lr=learning_rate)#mlflow.set_experiment("makeMoE")with mlflow.start_run():#If you use mlflow.autolog() this will be automatically logged. I chose to explicitly log here for completenessparams = {"batch_size": batch_size , "block_size" : block_size, "max_iters": max_iters, "eval_interval": eval_interval,"learning_rate": learning_rate, "device": device, "eval_iters": eval_iters, "dropout" : dropout, "num_experts": num_experts, "top_k": top_k }mlflow.log_params(params)for iter in range(max_iters):# every once in a while evaluate the loss on train and val setsif iter % eval_interval == 0 or iter == max_iters - 1:losses = estimate_loss()print(f"step {iter}: train loss {losses['train']:.4f}, val loss {losses['val']:.4f}")metrics = {"train_loss": losses['train'], "val_loss": losses['val']}mlflow.log_metrics(metrics, step=iter)# sample a batch of dataxb, yb = get_batch('train')# evaluate the losslogits, loss = model(xb, yb)optimizer.zero_grad(set_to_none=True)loss.backward()optimizer.step()8.996545 M parametersstep 0: train loss 5.3223, val loss 5.3166step 100: train loss 2.7351, val loss 2.7429step 200: train loss 2.5125, val loss 2.5233...step 4999: train loss 1.5712, val loss 1.7508
记录训练和验证损失可以很好地指示训练的进展情况。该图显示,可能应该在 4500 次时停止(当验证损失稍微增加时)
接下来可以使用这个模型逐字符自回归地生成文本。
# generate from the model. Not great. Not too bad eithercontext = torch.zeros((1, 1), dtype=torch.long, device=device)print(decode(m.generate(context, max_new_tokens=2000)[0].tolist()))
DUKE VINCENVENTIO:If it ever fecond he town sue kigh now,That thou wold'st is steen 't.SIMNA:Angent her; no, my a born Yorthort,Romeoos soun and lawf to your sawe with ch a woft ttastly defy,To declay the soul art; and meart smad.CORPIOLLANUS:Which I cannot shall do from by born und ot cold warrike,What king we best anone wrave's going of heard and goodThus playvage; you have wold the grace....
本文参考内容:
在实施过程中,作者大量参考了以下出版物:
混合专家模型:https://arxiv.org/pdf/2401.04088.pdf
超大型神经网络:稀疏门控混合专家层:https://arxiv.org/pdf/1701.06538.pdf
来自 Andrej Karpathy 的原始 makemore 实现:https://github.com/karpathy/makemore
还可以尝试以下几种方法,来提高模型性能:
提高混合专家模块的效率;
尝试不同的神经网络初始化策略;
从字符级到子词级的分词;
对专家数量和 k 的取值(每个 token 激活的专家数量)进行贝叶斯超参数搜索。这可以归类为神经架构搜索。
优化专家能力。













IntelliJ IDEA 是 JetBrains 推出的专业集成开发环境,重点服务于 Java、Kotlin 与 JVM 项目开发。软件集成代码补全、静态检查、重构、调试、测试、版本控制及构建工具,并可借助插件扩展语言和框架支持。

JetBrains PyCharm 是面向 Python 开发者的集成开发环境,提供智能补全、代码检查、重构、调试、测试、版本控制及虚拟环境管理功能。Mac 版兼容 Intel 与 Apple 芯片,核心功能可免费使用。

JetBrains WebStorm 是面向 JavaScript、TypeScript 和现代 Web 技术的专业集成开发环境,可智能理解项目结构,提供代码补全、重构、错误检查、运行调试、测试及 Git 工具。

Adobe After Effects 是面向动态图形、影视特效与视频合成的专业创作软件。它提供关键帧动画、遮罩抠像、运动跟踪、三维空间、文字动画和表达式等工具,并可与 Premiere Pro、Photoshop、Illustrator

Adobe Audition 是面向播客、影视后期、音乐制作及内容创作者的专业音频工作站,提供波形精修、多轨录制与混音、频谱编辑、降噪修复、响度匹配和效果处理工具,并可与 Adobe Premiere 协同完成视频声音制作。

Adobe Bridge 是面向摄影师、设计师及内容团队的免费数字资产管理工具,可集中预览照片、视频和 Adobe 项目文件,并利用评级、标签、关键词、元数据、筛选与收藏集完成分类检索。它还支持批量重命名、格式导出、相机导入及 Camera

Adobe Illustrator 是 Adobe 推出的专业矢量图形设计软件,适合在 Mac 上制作标志、图标、插画、包装、信息图及印刷版面。它以路径和锚点构建可无损缩放的图形,并提供钢笔、形状、文字、图像描摹、渐变、画板及生成式功能。

Adobe InDesign 是面向印刷品与数字出版物的专业版面设计软件,可在 Mac 上制作书籍、杂志、宣传册、海报、报告及交互式文档。它提供精细的文字样式、网格、母版、长文档管理和印前输出能力。

Adobe Lightroom Classic 是面向桌面摄影工作流的照片管理与后期处理软件,可将原始照片保存在本地硬盘,通过目录、关键词、评分和收藏夹高效整理图库,并提供 RAW 冲印、蒙版、镜头校正、批量同步及多格式导出等功能。

Adobe Media Encoder 是 Adobe 推出的专业音视频编码与转码工具,可通过队列、预设和监视文件夹批量完成格式转换、代理文件创建及多平台成片输出,并与 Premiere Pro、After Effects 等软件紧密协作。

Adobe Photoshop 是面向摄影师、设计师和内容创作者的专业图像处理软件,提供图层、蒙版、选区、修复、调色、文字排版、智能对象及生成式编辑等能力。Mac 版支持 Intel 与 Apple Silicon 处理器。

Adobe Premiere Pro 是面向专业视频制作的非线性剪辑软件,提供多轨时间线、调色、音频处理、字幕、代理工作流和多格式输出能力,并可与 After Effects、Audition、Photoshop 及 Frame.io 协同

JetBrains IntelliJ IDEA 是以 Java、Kotlin 和 JVM 项目为核心的专业集成开发环境,提供智能补全、代码检查、安全重构、调试、测试、版本控制及构建工具集成。统一发行版的核心功能可免费用于商业和非商业项目,

PhpStorm 是 JetBrains 面向 PHP 与现代 Web 开发打造的专业集成开发环境,提供代码补全、静态检查、重构、调试、测试、数据库、版本控制及前端语言支持。Windows 用户可直接下载安装程序,

PyCharm 是 JetBrains 推出的 Python 集成开发环境,提供智能代码补全、错误检查、重构、调试、测试、Git、终端及 Jupyter Notebook 支持。统一版安装后可体验 30 天 Pro 功能,

WebStorm 是 JetBrains 面向 JavaScript、TypeScript 和现代 Web 技术打造的集成开发环境。它提供项目级代码分析、智能补全、安全重构、导航搜索,并集成调试、测试、终端、Git 与常用前端工具,

Adobe Photoshop 是面向摄影师、设计师和内容创作者的专业图像处理工具,可在 Windows 上完成照片修饰、选区抠图、图层合成、文字排版、绘画及生成式编辑。软件采用订阅授权,由 Creative Cloud 管理安装、更新与许

Adobe InDesign 是面向印刷与数字出版的专业页面排版工具,可制作书籍、杂志、宣传册、海报、交互式 PDF 和电子书。它提供精细的文字样式、多页面管理、印前检查及多格式输出能力,并能与 Photoshop、Illustrator

Adobe Illustrator 是用于绘制矢量图形、插画、图标、徽标和版式的专业设计工具。它以路径和锚点为核心,作品放大后仍能保持清晰,并提供画板、文字、渐变、图像描摹及精确变换等功能,适合品牌视觉、印刷物料、数字界面和商业插画创作。

Adobe Bridge 是 Adobe 推出的创意资产管理工具,可集中预览、分类和查找照片、视频、PDF及多种设计文件,并支持元数据、关键词、评级、批量重命名和格式导出。它可与 Photoshop、Illustrator 等应用衔接,

Adobe Lightroom Classic 是面向 Windows 桌面摄影工作流的照片管理与无损编辑工具,可通过目录集中整理大型图库,并完成 RAW 显影、局部蒙版、批量调整、打印和多格式导出。它强调本地文件管理与精细控制,

Adobe Acrobat Pro 是面向专业 PDF 工作的综合解决方案,可在 Windows 中创建、编辑、转换、比较、整理和保护文档,并支持表单、电子签名、扫描件文字识别及敏感信息永久遮盖。订阅还包含网页、移动服务和云端协作能力,

Adobe After Effects 是面向动态图形、动画与影视视觉特效制作的专业工具,可完成关键帧动画、图层合成、遮罩跟踪、抠像、文字动画和二维三维元素整合。Windows 版通过 Adobe Creative Cloud 安装及更新,

Adobe Media Encoder 是 Adobe 面向视频与音频制作流程提供的专业编码和转码工具,可批量处理媒体文件、创建代理、套用输出预设并监控文件夹自动执行任务。它与 Premiere、After Effects、Audition