


SpringBoot启动原理是什么
入口版本:2.1.8.RELEASE启动代码:@SpringBootApplcationpublicstaticvoidmain(String[]args){SpringApplication.run(BlogAdminApplication.class,args);System.out.println("========adminstartsuccess...==========");}这里传入了两个参数,BlogAdminApplication当前类和args参数我们点击进入run方法查看public
入口
版本: 2.1.8.RELEASE
启动代码:
@SpringBootApplcation
public static void main(String[] args) {
    SpringApplication.run(BlogAdminApplication.class, args);
    System.out.println("======== admin start success... ==========");
}
这里传入了两个参数,BlogAdminApplication当前类和args参数
我们点击进入run方法查看
public static ConfigurableApplicationContext run(Class primarySource, String... args) {
    return run(new Class[]{primarySource}, args);
}
这里是将我们写的启动类传入到了Class[]数组中,这步就是个单纯的参数转换。
探讨primarySource参数
那么问题是primarySource能接受的类型是啥样的,是不是什么类都可以接受,带着这个疑问,我们做一个测试,把这个参数给换成一个别的类呢,ManagerController类是一个我写的接口类
@SpringBootApplication
public class BlogProjectApplication {
   public static void main(String[] args) {
       SpringApplication.run(ManagerController.class, args);
       System.out.println("======== admin start success... ==========");
   }
}
控制台打印
org.springframework.context.ApplicationContextException: Unable to start web server; nested exception is org.springframework.context.ApplicationContextException: Unable to start ServletWebServerApplicationContext due to missing ServletWebServerFactory bean.
提示不能启动服务,提示缺少了ServletWebServerFactory bean 点进这个类看下
@FunctionalInterface
public interface ServletWebServerFactory {
    WebServer getWebServer(ServletContextInitializer... initializers);
}
他被FunctionalInterface标注了,是一个函数式接口,只有一个getWebServer方法,用来获取webServer的 看下他的实现类,

这不就是提示我们缺少启动的服务容器么,说的直白点,我的理解就是他缺少可以运行的容器,我们知道,没有使用springboot项目之前,我们的项目都是跑在tomcat容器上的,当然也有使用Jetty容器的。再者,我们知道SpringBoot是对tomcat进行了内置。而SpringBoot不仅仅是只有内置了tomcat,而且还内置了好多的东西,比如我们经常使用的mq、redis等等一系列的东西,这个我们可以在spring.factories配置文件中看到,这个文件位于如下位置
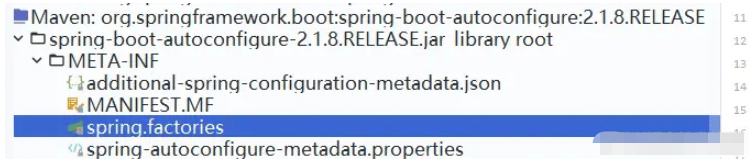
大概内容有下,篇幅有限,就不一一列举了。
省略。。。
org.springframework.boot.autoconfigure.EnableAutoConfiguration=\
org.springframework.boot.autoconfigure.admin.SpringApplicationAdminJmxAutoConfiguration,\
org.springframework.boot.autoconfigure.aop.AopAutoConfiguration,\
org.springframework.boot.autoconfigure.amqp.RabbitAutoConfiguration,\
org.springframework.boot.autoconfigure.batch.BatchAutoConfiguration,\
org.springframework.boot.autoconfigure.cache.CacheAutoConfiguration,\
省略。。。
那么回过头来,我们再看下这个问题,这些个类是如何被加载进来的,我们知道SpingBoot有个注解是开启自动注解的@EnableAutoConfiguration,他就干这个事情的。他能够激活SpringBoot内建和自定义组件的自动装配特性。
那么,知道了这些,我们把这个之前修改后的类给改造一下,加上注解@EnableAutoConfiguration,看下执行效果。
@RestController
@RequestMapping("project/manager")
@EnableAutoConfiguration
public class ManagerController extends AbstractController {
运行如下
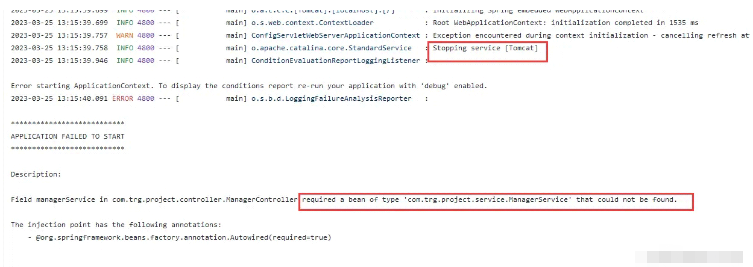
从打印信息就能知道,服务器有了,只不过下面报错,提示找不到bean,那这不就简单了么,他是不是就是没有扫描到我们的包么,这里就其实可以在配置扫描包的注解继续测试,我就懒的不测试了,直接去看@SpringBootApplication注解
@Target({ElementType.TYPE})
@Retention(RetentionPolicy.RUNTIME)
@Documented
@Inherited
@SpringBootConfiguration
@EnableAutoConfiguration
//
@ComponentScan(
    excludeFilters = {@Filter(
    type = FilterType.CUSTOM,
    classes = {TypeExcludeFilter.class}
), @Filter(
    type = FilterType.CUSTOM,
    classes = {AutoConfigurationExcludeFilter.class}
)}
)
public @interface SpringBootApplication {
@SpringBootApplication这个注解其实就是一个组合注解,里面包含了
元注解:用来标注他是一个注解的,jdk自带的
@SpringBootConfiguration:集成自@Configuration,表示是一个配置类
@EnableAutoConfiguration:激活SpringBoot内建和自定义组件的自动装配特性
@ComponentScan:扫描注解,添加了排除参数,指定排除了一些类
通过这里的实验,我们可以得出结论:
primarySource参数能接收的类是一个配置类,同时要把符合扫描规则的类装配到spring容器中,并且对SpringBoot内置的一些类进行自动扫描到,而这里的@SpringBootApplication注解就是把这些特性都整合到了一起,作为了一个引导类而已。那么说白了,primarySource他接受的其实就是一个配置类。
关于注解详细知识的话,这里就聊这么多了,后面再详细聊。
args参数
args是Java命令行参数,我们在DOS中执行Java程序的时候使用“java 文件名 args参数”。args这个数组可以接收到这些参数。这个是个基础常识了。
以下我们将继续跟踪源码进行分析
我们继续追run()方法
public static ConfigurableApplicationContext run(Class<?>[] primarySources, String[] args) {
    return (new SpringApplication(primarySources)).run(args);
}
这个方法干了两个事情:
1、new SpringApplication()来创建对象
2、通过创建后的对象,调用对象里面的run()方法
以下我们将从这两个地方进行分析,本篇就先研究第一个
创建对象
我们先看下他是怎么创建对象的,创建了哪些对象,
public SpringApplication(Class... primarySources) {
    this((ResourceLoader)null, primarySources);
}
public SpringApplication(ResourceLoader resourceLoader, Class... primarySources) {
    //资源加载器
   this.resourceLoader = resourceLoader;
   //断言
   Assert.notNull(primarySources, "PrimarySources must not be null");
   //对primarySources进行存储到LinkedHashSet
   this.primarySources = new LinkedHashSet<>(Arrays.asList(primarySources));
   //1、推断web应用类别
   this.webApplicationType = WebApplicationType.deduceFromClasspath();
   //2、加载Spring应用上下文初始化
   setInitializers((Collection) getSpringFactoriesInstances(ApplicationContextInitializer.class));
   //3、加载Spring应用事件监听器
   setListeners((Collection) getSpringFactoriesInstances(ApplicationListener.class));
   //4、推断应用引导类
   this.mainApplicationClass = deduceMainApplicationClass();
}
下面研究下主要流程部分
1、推断web应用类别
推断web应用类型属于SpringBoot应用web类型的初始化过程。而该类型也可在SpringApplication构造后,run方法执行之前,通过setWebApplicationType(WebApplicationType webApplicationType)方法进行调整。
在推断Web应用类型的过程中,由于当前Spring应用上下文尚未准备(可在代码执行顺序中看到),所以实现采用的是检查检查当前ClassLoader下基准Class的存在性判断。
上源码
this.webApplicationType = WebApplicationType.deduceFromClasspath();
private static final String[] SERVLET_INDICATOR_CLASSES = { "javax.servlet.Servlet",
      "org.springframework.web.context.ConfigurableWebApplicationContext" };
private static final String WEBMVC_INDICATOR_CLASS = "org.springframework." + "web.servlet.DispatcherServlet";
private static final String WEBFLUX_INDICATOR_CLASS = "org." + "springframework.web.reactive.DispatcherHandler";
private static final String JERSEY_INDICATOR_CLASS = "org.glassfish.jersey.servlet.ServletContainer";
private static final String SERVLET_APPLICATION_CONTEXT_CLASS = "org.springframework.web.context.WebApplicationContext";
private static final String REACTIVE_APPLICATION_CONTEXT_CLASS = "org.springframework.boot.web.reactive.context.ReactiveWebApplicationContext";
static WebApplicationType deduceFromClasspath() {
//当DispatcherHandler存在,且DispatcherServlet、ServletContainer两个不存在时;换言之,SpringBoot仅依赖WebFlux存在时,此时的应用类型为REACTIVE
   if (ClassUtils.isPresent(WEBFLUX_INDICATOR_CLASS, null) && !ClassUtils.isPresent(WEBMVC_INDICATOR_CLASS, null)
         && !ClassUtils.isPresent(JERSEY_INDICATOR_CLASS, null)) {
      return WebApplicationType.REACTIVE;
   }
   //当Servlet和ConfigurableWebApplicationContext均不存在时,当前应用为非Web应用,即WebApplicationType.NONE,因为这些API均是Spring Web MVC必须的依赖
   for (String className : SERVLET_INDICATOR_CLASSES) {
      if (!ClassUtils.isPresent(className, null)) {
         return WebApplicationType.NONE;
      }
   }
   //当WebFlux和Spring Web MVC同时存在时,Web应用类型同样是Servlet Web,即WebApplicationType.SERVLET
   return WebApplicationType.SERVLET;
}
2、加载Spring应用上下文初始化
setInitializers((Collection) getSpringFactoriesInstances(ApplicationContextInitializer.class));
此过程包含两个动作,依次为getSpringFactoriesInstances(ApplicationContextInitializer.class)和setInitializers方法。 先看第一个过程
privateCollection getSpringFactoriesInstances(Class type) { return getSpringFactoriesInstances(type, new Class[] {}); } private Collection getSpringFactoriesInstances(Class type, Class[] parameterTypes, Object... args) { //获取类加载器 ClassLoader classLoader = getClassLoader(); // Use names and ensure unique to protect against duplicates //加载了META-INF/spring.factories资源中配置的ApplicationContextInitializer实现类名单。 Set names = new LinkedHashSet<>(SpringFactoriesLoader.loadFactoryNames(type, classLoader)); //初始化 List instances = createSpringFactoriesInstances(type, parameterTypes, classLoader, args, names); AnnotationAwareOrderComparator.sort(instances); return instances; }
此处使用了Spring工厂加载机制方法SpringFactoriesLoader.loadFactoryNames(type, classLoader)。加载了META-INF/spring.factories资源中配置的ApplicationContextInitializer实现类名单。
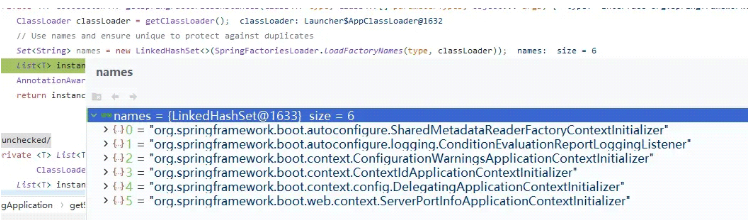
加载完成后使用createSpringFactoriesInstances方法对其进行初始化。
privateList createSpringFactoriesInstances(Class type, Class[] parameterTypes, ClassLoader classLoader, Object[] args, Set names) { List instances = new ArrayList<>(names.size()); for (String name : names) { try { //从类加载器中获取指定类 Class instanceClass = ClassUtils.forName(name, classLoader); //判断instanceClass是不是type的子类 Assert.isAssignable(type, instanceClass); //根据以上获取的类名创建类的实例 Constructor constructor = instanceClass.getDeclaredConstructor(parameterTypes); //排序 T instance = (T) BeanUtils.instantiateClass(constructor, args); instances.add(instance); } catch (Throwable ex) { throw new IllegalArgumentException("Cannot instantiate " + type + " : " + name, ex); } } return instances; }
3、加载Spring应用事件监听器
setListeners((Collection) getSpringFactoriesInstances(ApplicationListener.class));
此过程与2、加载上下文初始化基本类似。 只不过初始化的对象类型变成了ApplicationListener.class,setListeners方法也只是赋值而已
public void setListeners(Collection> listeners) {
   this.listeners = new ArrayList<>();
   this.listeners.addAll(listeners);
}
4、推断应用引导类
this.mainApplicationClass = deduceMainApplicationClass();
private Class deduceMainApplicationClass() {
  try {
     StackTraceElement[] stackTrace = new RuntimeException().getStackTrace();
     for (StackTraceElement stackTraceElement : stackTrace) {
        if ("main".equals(stackTraceElement.getMethodName())) {
           return Class.forName(stackTraceElement.getClassName());
        }
     }
  }
  catch (ClassNotFoundException ex) {
     // Swallow and continue
  }
  return null;
}
这里使用到了new RuntimeException().getStackTrace()来获取堆栈信息,找到调用执行的main方法,从而确定他的类。
这里有个疑问:他不是传了primarySources数组,里面包含了类名么,怎么还用堆栈的方式去获取,此外,这里的堆栈获取也只能获取一个调用的主main方法,他为啥还要传一个Class数组呢?
具体咋获取的,可以追下源码,一直跟踪他的父类Throwable,找到如下代码
/**
 * Fills in the execution stack trace. This method records within this
 * {@code Throwable} object information about the current state of
 * the stack frames for the current thread.
 *
 * If the stack trace of this {@code Throwable} {@linkplain
 * Throwable#Throwable(String, Throwable, boolean, boolean) is not
 * writable}, calling this method has no effect.
 *
 * @return  a reference to this {@code Throwable} instance.
 * @see     java.lang.Throwable#printStackTrace()
 */
public synchronized Throwable fillInStackTrace() {
    if (stackTrace != null ||
        backtrace != null /* Out of protocol state */ ) {
        fillInStackTrace(0);
        stackTrace = UNASSIGNED_STACK;
    }
    return this;
}
private native Throwable fillInStackTrace(int dummy);
这里最后调用了native本地方法,去爬取线程堆栈信息,为运行时栈做一份快照。
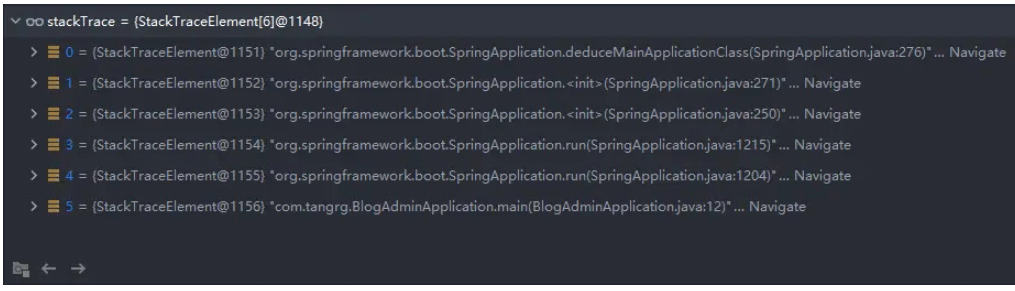
通过这个图片,可以看到整个方法的调用链,从下往上看哦





Postman是一套面向API全生命周期的开发与测试平台,可在Mac上发送和调试多种协议请求,管理集合、环境及认证信息,并完成脚本测试、模拟服务、监控、文档发布和团队协作。它适合开发、测试及运维人员使用,提供个人免费方案。
Docker Desktop 是 Docker 官方为 Mac 提供的容器开发环境,集成 Docker Engine、命令行工具、Compose、Build、Kubernetes 与图形化管理界面。

Android Studio 是 Google 面向安卓应用开发提供的官方集成开发环境,基于 IntelliJ IDEA 构建。它整合智能代码编辑、Gradle 构建、界面预览、设备模拟、性能分析、调试测试及 APK 分析等工具。

Xcode 是苹果面向 Mac 提供的官方集成开发环境,将代码编辑、项目构建、SwiftUI 实时预览、设备模拟、自动化测试、断点调试、性能分析和应用分发整合在同一套工作流中,适合开发与维护 iPhone、iPad、Mac、Apple Wa

JetBrains WebStorm 是面向 JavaScript、TypeScript 和现代 Web 技术的专业集成开发环境,可智能理解项目结构,提供代码补全、重构、错误检查、运行调试、测试及 Git 工具。

PhpStorm 是 JetBrains 推出的专业 PHP 集成开发环境,可在 Mac 上完成代码编写、智能检查、重构、调试、测试和数据库管理。它支持主流 PHP 框架、Composer、Git、Docker 与远程解释器。

JetBrains PyCharm 是面向 Python 开发者的集成开发环境,提供智能补全、代码检查、重构、调试、测试、版本控制及虚拟环境管理功能。Mac 版兼容 Intel 与 Apple 芯片,核心功能可免费使用。

IntelliJ IDEA 是 JetBrains 推出的专业集成开发环境,重点服务于 Java、Kotlin 与 JVM 项目开发。软件集成代码补全、静态检查、重构、调试、测试、版本控制及构建工具,并可借助插件扩展语言和框架支持。

Visual Studio Code 是微软提供的免费代码编辑器,支持 macOS,并为 Intel 与 Apple 芯片 Mac 提供适配版本。软件集代码编辑、调试、Git 源代码管理、集成终端和扩展市场于一体。

REAPER是Cockos开发的数字音频工作站,提供多轨音频与MIDI录制、剪辑、处理、混音和母带制作工具。Mac版兼容Intel与Apple芯片,支持AU、VST、VST3、CLAP等插件格式,并提供高度可定制的工作流程。

Adobe Audition 是面向播客、影视后期、音乐制作及内容创作者的专业音频工作站,提供波形精修、多轨录制与混音、频谱编辑、降噪修复、响度匹配和效果处理工具,并可与 Adobe Premiere 协同完成视频声音制作。

Pro Tools 是 Avid 推出的专业数字音频工作站,覆盖多轨录音、无损剪辑、MIDI 编曲、插件处理、自动化混音及声音与画面同步等工作。它拥有 Intro、Artist、Studio 和 Ultimate 等方案。

PixPix 是面向品牌、卖家和内容团队的在线 AI 图片视频创作平台,提供图视频 Agent、无限画布、图片生成、视频生成、自然语言编辑及商品套图、产品精修和带货视频等电商工具。

Postman 是面向 API 全生命周期的开发与协作平台。Windows 桌面版可用于构建和发送 HTTP、GraphQL、gRPC、WebSocket、MQTT 等请求,并提供环境变量、集合、脚本测试、模拟服务、监控、文档及团队工作区等

Docker Desktop 为 Windows 开发者提供集成式容器环境,内置 Docker Engine、命令行工具、Compose、Build 与 Kubernetes 等组件,可在本机完成镜像构建、容器运行、日志查看和资源管理。

Android Studio 是 Google 面向 Android 应用开发提供的官方集成开发环境,以 IntelliJ IDEA 为基础,集成智能代码编辑、Gradle 构建、设备模拟、界面预览、调试测试及性能分析工具,

WebStorm 是 JetBrains 面向 JavaScript、TypeScript 和现代 Web 技术打造的集成开发环境。它提供项目级代码分析、智能补全、安全重构、导航搜索,并集成调试、测试、终端、Git 与常用前端工具,

PhpStorm 是 JetBrains 面向 PHP 与现代 Web 开发打造的专业集成开发环境,提供代码补全、静态检查、重构、调试、测试、数据库、版本控制及前端语言支持。Windows 用户可直接下载安装程序,

PyCharm 是 JetBrains 推出的 Python 集成开发环境,提供智能代码补全、错误检查、重构、调试、测试、Git、终端及 Jupyter Notebook 支持。统一版安装后可体验 30 天 Pro 功能,

JetBrains IntelliJ IDEA 是以 Java、Kotlin 和 JVM 项目为核心的专业集成开发环境,提供智能补全、代码检查、安全重构、调试、测试、版本控制及构建工具集成。统一发行版的核心功能可免费用于商业和非商业项目,

Visual Studio Code 是微软推出的免费代码编辑器,Windows 版集成智能补全、代码导航、调试、终端和版本控制,并可通过扩展添加语言、格式化及远程开发能力。它启动较快、配置灵活,

REAPER 是 Cockos 推出的数字音频工作站,适用于录音、MIDI 编曲、音频编辑、混音、母带制作及声音设计。软件安装包小巧,支持多轨录制、灵活路由、自动化、第三方插件和脚本扩展,并提供完整功能的 60 天免费评估期。

Adobe Audition 是面向播客、影视后期、广播与音乐制作的专业音频工作站,提供波形编辑、多轨混音、频谱分析、录音、降噪修复和效果处理等功能。Windows 版通过 Adobe Creative Cloud 安装和管理,

Pro Tools 是 Avid 推出的专业数字音频工作站,提供多轨录音、音频剪辑、MIDI编曲、插件处理、自动化混音及影视声音制作能力。它适合音乐人、录音师、制作人和音频后期团队使用,并提供免费入门版、订阅方案及永久授权选择。