


SpringBoot安全管理之Spring Security如何配置
在Java开发领域常见的安全框架有Shiro和SpringSecurity。Shiro是一个轻量级的安全管理框架,提供了认证、授权、会话管理、密码管理、缓存管理等功能。SpringSecurity是一个相对复杂的安全管理框架,功能比Shiro更加强大,权限控制细粒度更高,对OAuth2的支持也很友好,又因为SpringSecurity源自Spring家族,因此可以和Spring框架无缝整合,特别是SpringBoot中提供的自动化配置方案,可以让SpringSecurity的使用更加便捷。SpringSe
在 Java 开发领域常见的安全框架有 Shiro 和 Spring Security。Shiro 是一个轻量级的安全管理框架,提供了认证、授权、会话管理、密码管理、缓存管理等功能。Spring Security 是一个相对复杂的安全管理框架,功能比 Shiro 更加强大,权限控制细粒度更高,对 OAuth 2 的支持也很友好,又因为 Spring Security 源自 Spring 家族,因此可以和 Spring 框架无缝整合,特别是 Spring Boot 中提供的自动化配置方案,可以让 Spring Security 的使用更加便捷。
Spring Security 的基本配置
基本用法
1. 创建项目添加依赖
创建一个 Spring Boot 项目,然后添加 spring-boot-starter-security 依赖即可
  org.springframework.boot
  spring-boot-starter-web


  org.springframework.boot
  spring-boot-starter-security
2. 添加 hello 接口
@RestController
public class HelloController {
    @GetMapping("/hello")
    public String hello() {
        return "hello";
    }
}
3. 启动项目测试
启动成功后,访问 /hello 接口就会自动跳转到登录页面,这个登录页面是由 Spring Security 提供的
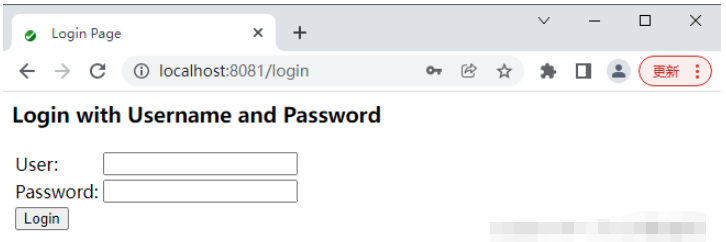
默认的用户名是 user ,默认的登录密码则在每次启动项目时随机生成,查看项目启动日志
Using generated security password: 4f845a17-7b09-479c-8701-48000e89d364
登录成功后,用户就可以访问 /hello 接口了
配置用户名和密码
如果开发者对默认的用户名和密码不满意,可以在 application.properties 中配置默认的用户名、密码以及用户角色
spring.security.user.name=tangsan
spring.security.user.password=tangsan
spring.security.user.roles=admin
基于内存的认证
开发者也可以自定义类继承自 WebSecurityConfigurer,进而实现对 Spring Security 更多的自定义配置,例如基于内存的认证,配置方式如下:
@Configuration
public class MyWebSecurityConfig extends WebSecurityConfigurerAdapter {
    @Bean
    PasswordEncoder passwordEncoder() {
        return NoOpPasswordEncoder.getInstance();
    }
    @Override
    protected void configure(AuthenticationManagerBuilder auth) throws Exception {
        auth.inMemoryAuthentication()
                .withUser("admin").password("123123").roles("ADMIN", "USER")
                .and()
                .withUser("tangsan").password("123123").roles("USER");
    }
}
代码解释:
自定义 MyWebSecurityConfig 继承自 WebSecurityConfigurerAdapter ,并重写 configure(AuthenticationManagerBuilder auth) 方法,在该方法中配置两个用户,一个用户是 admin ,具备两个角色 ADMIN、USER;另一个用户是 tangsan ,具备一个角色 USER
此处使用的 Spring Security 版本是 5.0.6 ,在 Spring Security 5.x 中引入了多种密码加密方式,开发者必须指定一种,此处使用 NoOpPasswordEncoder ,即不对密码进行加密
注意:基于内存的用户配置,在配置角色时不需要添加 “ROLE_” 前缀,这点和后面 10.2 节中基于数据库的认证有差别。
配置完成后,重启项目,就可以使用这里配置的两个用户进行登录了。
HttpSecurity
虽然现在可以实现认证功能,但是受保护的资源都是默认的,而且不能根据实际情况进行角色管理,如果要实现这些功能,就需要重写 WebSecurityConfigurerAdapter 中的另一个方法
@Configuration
public class MyWebSecurityConfig extends WebSecurityConfigurerAdapter {
    @Bean
    PasswordEncoder passwordEncoder() {
        return NoOpPasswordEncoder.getInstance();
    }
    @Override
    protected void configure(AuthenticationManagerBuilder auth) throws Exception {
        auth.inMemoryAuthentication()
                .withUser("root").password("123123").roles("ADMIN", "DBA")
                .and()
                .withUser("admin").password("123123").roles("ADMIN", "USER")
                .and()
                .withUser("tangsan").password("123123").roles("USER");
    }
    @Override
    protected void configure(HttpSecurity http) throws Exception {
        http.authorizeRequests()
                .antMatchers("/admin/**")
                .hasRole("ADMIN")
                .antMatchers("/user/**")
                .access("hasAnyRole('ADMIN','USER')")
                .antMatchers("/db/**")
                .access("hasRole('ADMIN') and hasRole('DBA')")
                .anyRequest()
                .authenticated()
                .and()
                .formLogin()
                .loginProcessingUrl("/login")
                .permitAll()
                .and()
                .csrf()
                .disable();
    }
}
代码解释:
首先配置了三个用户,root 用户具备 ADMIN 和 DBA 的角色,admin 用户具备 ADMIN 和 USER 角色,tangsan 用于具备 USER 角色
调用 authorizeRequests() 方法开启 HttpSecurity 的配置,antMatchers() ,hasRole() ,access() 方法配置访问不同的路径需要不同的用户及角色
anyRequest(),authenticated() 表示出了前面定义的之外,用户访问其他的 URL 都必须认证后访问
formLogin(),loginProcessingUrl(“/login”),permitAll(),表示开启表单登录,前面看到的登录页面,同时配置了登录接口为 /login 即可以直接调用 /login 接口,发起一个 POST 请求进行登录,登录参数中用户名必须命名为 username ,密码必须命名为 password,配置 loginProcessingUrl 接口主要是方便 Ajax 或者移动端调用登录接口。最后还配置了 permitAll,表示和登录相关的接口都不需要认证即可访问。
配置完成后,在 Controller 中添加如下接口进行测试:
@RestController
public class HelloController {
    @GetMapping("/admin/hello")
    public String admin() {
        return "hello admin";
    }
    @GetMapping("/user/hello")
    public String user() {
        return "hello user";
    }
    @GetMapping("/db/hello")
    public String dba() {
        return "hello dba";
    }
    @GetMapping("/hello")
    public String hello() {
        return "hello";
    }
}
根据上文配置,“/admin/hello” 接口 root 和 admin 用户具有访问权限;“/user/hello” 接口 admin 和 tangsan 用户具有访问权限;“/db/hello” 只有 root 用户有访问权限。浏览器中的测试很容易,这里不再赘述。
登录表单详细配置
目前为止,登录表单一直使用 Spring Security 提供的页面,登录成功后也是默认的页面跳转,但是,前后端分离已经成为企业级应用开发的主流,在前后端分离的开发方式中,前后端的数据交互通过 JSON 进行,这时,登录成功后就不是页面跳转了,而是一段 JSON 提示。要实现这些功能,只需要继续完善上文的配置
@Override
protected void configure(HttpSecurity http) throws Exception {
    http.authorizeRequests()
        .antMatchers("/admin/**")
        .hasRole("ADMIN")
        .antMatchers("/user/**")
        .access("hasAnyRole('ADMIN','USER')")
        .antMatchers("/db/**")
        .access("hasRole('ADMIN') and hasRole('DBA')")
        .anyRequest()
        .authenticated()
        .and()
        .formLogin()
        .loginPage("/login_page")
        .loginProcessingUrl("/login")
        .usernameParameter("name")
        .passwordParameter("passwd")
        .successHandler(new AuthenticationSuccessHandler() {
            @Override
            public void onAuthenticationSuccess(HttpServletRequest req,
                                                HttpServletResponse resp,
                                                Authentication auth)
                throws IOException {
                Object principal = auth.getPrincipal();
                resp.setContentType("application/json;charset=utf-8");
                PrintWriter out = resp.getWriter();
                resp.setStatus(200);
                Map map = new HashMap<>();
                map.put("status", 200);
                map.put("msg", principal);
                ObjectMapper om = new ObjectMapper();
                out.write(om.writeValueAsString(map));
                out.flush();
                out.close();
            }
        })
        .failureHandler(new AuthenticationFailureHandler() {
            @Override
            public void onAuthenticationFailure(HttpServletRequest req,
                                                HttpServletResponse resp,
                                                AuthenticationException e)
                throws IOException {
                resp.setContentType("application/json;charset=utf-8");
                PrintWriter out = resp.getWriter();
                resp.setStatus(401);
                Map map = new HashMap<>();
                map.put("status", 401);
                if (e instanceof LockedException) {
                    map.put("msg", "账户被锁定,登录失败!");
                } else if (e instanceof BadCredentialsException) {
                    map.put("msg", "账户名或密码输入错误,登录失败!");
                } else if (e instanceof DisabledException) {
                    map.put("msg", "账户被禁用,登录失败!");
                } else if (e instanceof AccountExpiredException) {
                    map.put("msg", "账户已过期,登录失败!");
                } else if (e instanceof CredentialsExpiredException) {
                    map.put("msg", "密码已过期,登录失败!");
                } else {
                    map.put("msg", "登录失败!");
                }
                ObjectMapper om = new ObjectMapper();
                out.write(om.writeValueAsString(map));
                out.flush();
                out.close();
            }
        })
        .permitAll()
        .and()
        .csrf()
        .disable();
}
代码解释:
loginPage(“/login_page”) 表示如果用户未获授权就访问一个需要授权才能访问的接口,就会自动跳转到 login_page 页面让用户登录,这个 login_page 就是开发者自定义的登录页面,而不再是 Spring Security 提供的默认登录页
loginProcessingUrl(“/login”) 表示登录请求处理接口,无论是自定义登录页面还是移动端登录,都需要使用该接口
usernameParameter(“name”),passwordParameter(“passwd”) 定义了认证所需要的用户名和密码的参数,默认用户名参数是 username,密码参数是 password,可以在这里定义
successHandler() 方法定义了登录成功的处理逻辑。用户登录成功后可以跳转到某一个页面,也可以返回一段 JSON ,这个要看具体业务逻辑,此处假设是第二种,用户登录成功后,返回一段登录成功的 JSON 。onAuthenticationSuccess 方法的第三个参数一般用来获取当前登录用户的信息,在登录后,可以获取当前登录用户的信息一起返回给客户端
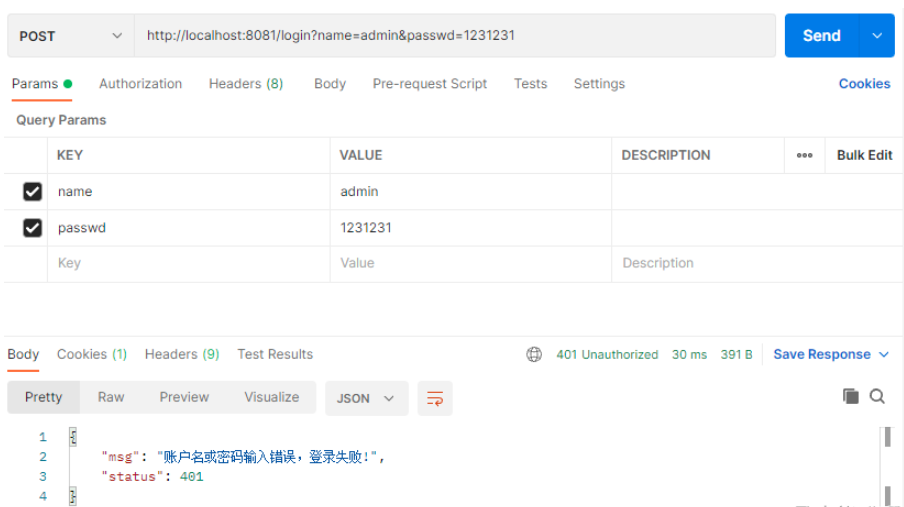
failureHandler 方法定义了登录失败的处理逻辑,和登录成功类似,不同的是,登录失败的回调方法里有一个 AuthenticationException 参数,通过这个异常参数可以获取登录失败的原因,进而给用户一个明确的提示
配置完成后,使用 Postman 进行测试
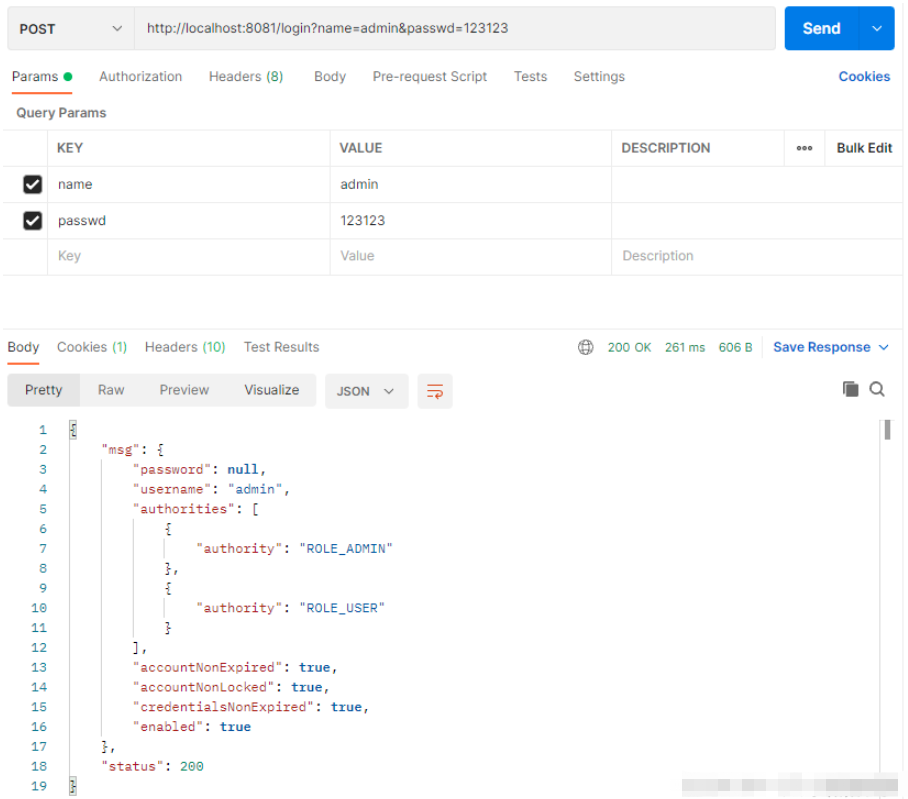
如果登录失败也会有相应的提示
注销登录配置
如果想要注销登录,也只需要提供简单的配置即可
@Override
protected void configure(HttpSecurity http) throws Exception {
    http.authorizeRequests()
        .antMatchers("/admin/**")
        .hasRole("ADMIN")
        .antMatchers("/user/**")
        .access("hasAnyRole('ADMIN','USER')")
        .antMatchers("/db/**")
        .access("hasRole('ADMIN') and hasRole('DBA')")
        .anyRequest()
        .authenticated()
        .and()
        .formLogin()
        .loginPage("/login_page")
        .loginProcessingUrl("/login")
        .usernameParameter("name")
        .passwordParameter("passwd")
        .successHandler(new AuthenticationSuccessHandler() {
            @Override
            public void onAuthenticationSuccess(HttpServletRequest req,
                                                HttpServletResponse resp,
                                                Authentication auth)
                throws IOException {
                Object principal = auth.getPrincipal();
                resp.setContentType("application/json;charset=utf-8");
                PrintWriter out = resp.getWriter();
                resp.setStatus(200);
                Map map = new HashMap<>();
                map.put("status", 200);
                map.put("msg", principal);
                ObjectMapper om = new ObjectMapper();
                out.write(om.writeValueAsString(map));
                out.flush();
                out.close();
            }
        })
        .failureHandler(new AuthenticationFailureHandler() {
            @Override
            public void onAuthenticationFailure(HttpServletRequest req,
                                                HttpServletResponse resp,
                                                AuthenticationException e)
                throws IOException {
                resp.setContentType("application/json;charset=utf-8");
                PrintWriter out = resp.getWriter();
                resp.setStatus(401);
                Map map = new HashMap<>();
                map.put("status", 401);
                if (e instanceof LockedException) {
                    map.put("msg", "账户被锁定,登录失败!");
                } else if (e instanceof BadCredentialsException) {
                    map.put("msg", "账户名或密码输入错误,登录失败!");
                } else if (e instanceof DisabledException) {
                    map.put("msg", "账户被禁用,登录失败!");
                } else if (e instanceof AccountExpiredException) {
                    map.put("msg", "账户已过期,登录失败!");
                } else if (e instanceof CredentialsExpiredException) {
                    map.put("msg", "密码已过期,登录失败!");
                } else {
                    map.put("msg", "登录失败!");
                }
                ObjectMapper om = new ObjectMapper();
                out.write(om.writeValueAsString(map));
                out.flush();
                out.close();
            }
        })
        .permitAll()
        .and()
        .logout()
        .logoutUrl("/logout")
        .clearAuthentication(true)
        .invalidateHttpSession(true)
        .addLogoutHandler(new LogoutHandler() {
            @Override
            public void logout(HttpServletRequest req,
                               HttpServletResponse resp,
                               Authentication auth) {
            }
        })
        .logoutSuccessHandler(new LogoutSuccessHandler() {
            @Override
            public void onLogoutSuccess(HttpServletRequest req,
                                        HttpServletResponse resp,
                                        Authentication auth)
                throws IOException {
                resp.sendRedirect("/login_page");
            }
        })
        .and()
        .csrf()
        .disable();
}
代码解释:
logout() 表示开启注销登录的配置
logoutUrl(“/logout”) 表示注销登录请求 URL 为 /logout ,默认也是 /logout
clearAuthentication(true) 表示是否清楚身份认证信息,默认为 true
invalidateHttpSession(true) 表示是否使 Session 失效,默认为 true
addLogoutHandler 方法中完成一些数据清楚工作,例如 Cookie 的清楚
logoutSuccessHandler 方法用于处理注销成功后的业务逻辑,例如返回一段 JSON 提示或者跳转到登录页面等
多个 HttpSecurity
如果业务比较复杂,也可以配置多个 HttpSecurity ,实现对 WebSecurityConfigurerAdapter 的多次扩展
@Configuration
public class MultiHttpSecurityConfig {
    @Bean
    PasswordEncoder passwordEncoder() {
        return NoOpPasswordEncoder.getInstance();
    }
    @Autowired
    protected void configure(AuthenticationManagerBuilder auth) throws Exception {
        auth.inMemoryAuthentication()
                .withUser("admin").password("123123").roles("ADMIN", "USER")
                .and()
                .withUser("tangsan").password("123123").roles("USER");
    }
    @Configuration
    @Order(1)
    public static class AdminSecurityConfig extends WebSecurityConfigurerAdapter{
        @Override
        protected void configure(HttpSecurity http) throws Exception {
            http.antMatcher("/admin/**").authorizeRequests()
                    .anyRequest().hasRole("ADMIN");
        }
    }
    @Configuration
    public static class OtherSecurityConfig extends WebSecurityConfigurerAdapter{
        @Override
        protected void configure(HttpSecurity http) throws Exception {
            http.authorizeRequests()
                    .anyRequest().authenticated()
                    .and()
                    .formLogin()
                    .loginProcessingUrl("/login")
                    .permitAll()
                    .and()
                    .csrf()
                    .disable();
        }
    }
}
代码解释:
配置多个 HttpSecurity 时,MultiHttpSecurityConfig 不需要继承 WebSecurityConfigurerAdapter ,在 MultiHttpSecurityConfig 中创建静态内部类继承 WebSecurityConfigurerAdapter 即可,静态内部类上添加 @Configuration 注解和 @Order注解,数字越大优先级越高,未加 @Order 注解的配置优先级最低
AdminSecurityConfig 类表示该类主要用来处理 “/admin/**” 模式的 URL ,其它 URL 将在 OtherSecurityConfig 类中处理
密码加密
1. 为什么要加密
略
2. 加密方案
Spring Security 提供了多种密码加密方案,官方推荐使用 BCryptPasswordEncoder,BCryptPasswordEncoder 使用 BCrypt 强哈希函数,开发者在使用时可以选择提供 strength 和 SecureRandom 实例。strength 越大,密码的迭代次数越多,密钥迭代次数为 2^strength 。strength 取值在 4~31 之间,默认为 10 。
3. 实践
只需要修改上文配置的 PasswordEncoder 这个 Bean 的实现即可
 @Bean
PasswordEncoder passwordEncoder() {
    return new BCryptPasswordEncoder(10);
}
参数 10 就是 strength ,即密钥的迭代次数(也可以不配置,默认为 10)。
使用以下方式获取加密后的密码。
public static void main(String[] args) {
    BCryptPasswordEncoder bCryptPasswordEncoder = new BCryptPasswordEncoder(10);
    String encode = bCryptPasswordEncoder.encode("123123");
    System.out.println(encode);
}
修改配置的内存用户的密码
auth.inMemoryAuthentication()
    .withUser("admin")
    .password("$2a$10$.hZESNfpLSDUnuqnbnVaF..Xb2KsAqwvzN7hN65Gd9K0VADuUbUzy")
    .roles("ADMIN", "USER")
    .and()
    .withUser("tangsan")
    .password("$2a$10$4LJ/xgqxSnBqyuRjoB8QJeqxmUeL2ynD7Q.r8uWtzOGs8oFMyLZn2")
    .roles("USER");
虽然 admin 和 tangsan 加密后的密码不一样,但是明文都是 123123 配置完成后,使用 admin/123123,或 tangsan/123123 就可以实现登录,一般情况下,用户信息是存储在数据库中的,因此需要用户注册时对密码进行加密处理
@Service
public class RegService {
    public int reg(String username, String password) {
        BCryptPasswordEncoder encoder = new BCryptPasswordEncoder(10);
        String encodePasswod = encoder.encode(password);
        return saveToDb(username, encodePasswod);
    }
    private int saveToDb(String username, String encodePasswod) {
        // 业务处理
        return 0;
    }
}
用户将密码从前端传来之后,通过 BCryptPasswordEncoder 实例中的 encode 方法对密码进行加密处理,加密完成后将密文存入数据库。
方法安全
上文介绍的认证和授权都是基于 URL 的,开发者也可通过注解来灵活配置方法安全,使用相关注解,首先要通过 @EnableGlobalMethodSecurity 注解开启基于注解的安全配置
@Configuration
@EnableGlobalMethodSecurity(prePostEnabled = true,securedEnabled = true)
public class MultiHttpSecurityConfig{
}
代码解释:
prePostEnabled = true 会解锁 @PreAuthorize 和 @PostAuthorize 两个注解, @PreAuthorize 注解会在方法执行前进行验证,而 @PostAuthorize 注解在方法执行后进行验证
securedEnabled = true 会解锁 @Secured 注解
开启注解安全后,创建一个 MethodService 进行测试
@Service
public class MethodService {
    @Secured("ROLE_ADMIN")
    public String admin() {
        return "hello admin";
    }
    @PreAuthorize("hasRole('ADMIN') and hasRole('DBA')")
    public String dba() {
        return "hello dba";
    }
    @PreAuthorize("hasAnyRole('ADMIN','DBA','USER')")
    public String user() {
        return "user";
    }
}
代码解释:
@Secured(“ROLE_ADMIN”) 注解表示访问该方法需要 ADMIN 角色,注意这里需要在角色前加一个前缀 ROLE_
@PreAuthorize(“hasRole(‘ADMIN’) and hasRole(‘DBA’)”) 注解表示访问该方法既需要 ADMIN 角色又需要 DBA 角色
@PreAuthorize(“hasAnyRole(‘ADMIN’,‘DBA’,‘USER’)”) 表示访问该方法需要 ADMIN 、DBA 或 USER 角色中至少一个
@PostAuthorize 和 @PreAuthorize 中都可以使用基于表达式的语法
最后在 Controller 中注入 Service 并调用 Service 中的方法进行测试
@RestController
public class HelloController {
    @Autowired
    MethodService methodService;
    @GetMapping("/hello")
    public String hello() {
        String user = methodService.user();
        return user;
    }
    @GetMapping("/hello2")
    public String hello2() {
        String admin = methodService.admin();
        return admin;
    }
    @GetMapping("/hello3")
    public String hello3() {
        String dba = methodService.dba();
        return dba;
    }
}
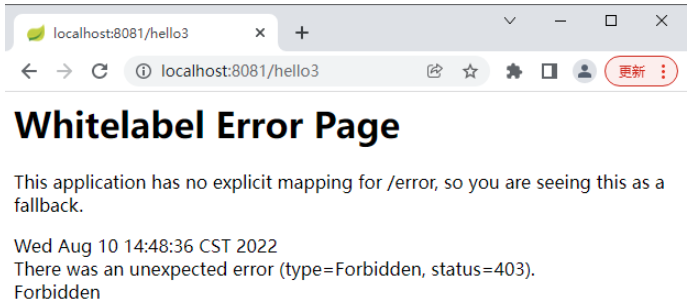
admin 访问 hello

admin 访问 hello2

admin 访问 hello3



WPS Office是一款面向macOS用户的综合办公套件,将文字处理、电子表格、演示文稿、PDF工具、模板与云协作整合在同一应用中。它兼容常见Microsoft Office格式,支持Intel及Apple芯片Mac,基础功能可免费使用,

Shapr3D是一款面向工业设计、机械工程、建筑概念和三维打印工作流的CAD软件。Mac版采用Parasolid建模内核,支持草图约束、实体建模、工程图、可视化渲染及常见CAD格式交换,并可通过账户在多台设备之间同步项目。

REAPER是Cockos开发的数字音频工作站,提供多轨音频与MIDI录制、剪辑、处理、混音和母带制作工具。Mac版兼容Intel与Apple芯片,支持AU、VST、VST3、CLAP等插件格式,并提供高度可定制的工作流程。

Ableton Live 是面向音乐制作人与现场表演者的数字音频工作站,提供编曲视图、独具特色的现场视图、音频录制、MIDI创作、实时变速、乐器及效果器。Mac版原生支持Apple芯片,并可连接音频接口、MIDI控制器和第三方插件。

Adobe After Effects 是面向动态图形、影视特效与视频合成的专业创作软件。它提供关键帧动画、遮罩抠像、运动跟踪、三维空间、文字动画和表达式等工具,并可与 Premiere Pro、Photoshop、Illustrator

Adobe Audition 是面向播客、影视后期、音乐制作及内容创作者的专业音频工作站,提供波形精修、多轨录制与混音、频谱编辑、降噪修复、响度匹配和效果处理工具,并可与 Adobe Premiere 协同完成视频声音制作。

Adobe Bridge 是面向摄影师、设计师及内容团队的免费数字资产管理工具,可集中预览照片、视频和 Adobe 项目文件,并利用评级、标签、关键词、元数据、筛选与收藏集完成分类检索。它还支持批量重命名、格式导出、相机导入及 Camera

Adobe Illustrator 是 Adobe 推出的专业矢量图形设计软件,适合在 Mac 上制作标志、图标、插画、包装、信息图及印刷版面。它以路径和锚点构建可无损缩放的图形,并提供钢笔、形状、文字、图像描摹、渐变、画板及生成式功能。

Adobe InDesign 是面向印刷品与数字出版物的专业版面设计软件,可在 Mac 上制作书籍、杂志、宣传册、海报、报告及交互式文档。它提供精细的文字样式、网格、母版、长文档管理和印前输出能力。

Adobe Lightroom Classic 是面向桌面摄影工作流的照片管理与后期处理软件,可将原始照片保存在本地硬盘,通过目录、关键词、评分和收藏夹高效整理图库,并提供 RAW 冲印、蒙版、镜头校正、批量同步及多格式导出等功能。

Adobe Media Encoder 是 Adobe 推出的专业音视频编码与转码工具,可通过队列、预设和监视文件夹批量完成格式转换、代理文件创建及多平台成片输出,并与 Premiere Pro、After Effects 等软件紧密协作。

Adobe Photoshop 是面向摄影师、设计师和内容创作者的专业图像处理软件,提供图层、蒙版、选区、修复、调色、文字排版、智能对象及生成式编辑等能力。Mac 版支持 Intel 与 Apple Silicon 处理器。

Autodesk Fusion 是面向产品设计与制造的云连接开发平台,在统一环境中整合三维 CAD、CAM、CAE、PCB、工程图、数据管理和团队协作功能,适合产品设计师、机械工程师、电子工程师及加工制造团队完成从概念建模、验证分析到生产交

Archicad 是 Graphisoft 面向建筑师、设计师、工程师及 BIM 团队开发的建筑信息模型平台。它把三维建筑建模、施工文档、数据管理、专业协调、实时协作和可视化集中在统一项目环境中,适合从概念方案到施工交付的完整建筑设计流程。

Vectorworks Architect 是面向建筑师、室内设计师和建筑顾问的综合设计与BIM平台,覆盖概念草图、二维制图、三维建模、施工文档、数据报表、可视化及开放式协作。它强调自由造型与数据化建筑对象并存,

Shapr3D 是一款基于 Siemens Parasolid 几何内核的专业三维CAD软件,可在 Windows 电脑和平板设备上完成草图绘制、实体建模、参数化修改、模型可视化及技术图纸制作。软件提供免费基础方案,

FreeCAD 是面向机械设计、产品开发、建筑建模和创客项目的免费开源参数化三维 CAD 工具。它可在 Windows 上完成约束草图、实体零件、装配、工程图、BIM、有限元分析及 CAM 等任务,

Twinmotion 是 Epic Games 推出的实时三维可视化工具,可导入常见 CAD、BIM 与三维模型,通过材质、环境、植被、灯光及动画资源快速构建场景,并输出图片、视频、全景图和交互演示。

BricsCAD 是以 DWG 为核心格式的专业 CAD 平台,可用于二维制图、三维建模、工程文档与设计协作。产品按 Lite、Pro、BIM、Mechanical 和 Ultimate 等层级提供不同工具,

Ableton Live 是面向音乐创作、录音、编曲、声音设计、混音与现场演出的数字音频工作站。它将适合即兴触发素材的 Session 视图与传统时间线编曲结合,并提供音频变速、MIDI工具、软件乐器、效果器和声音资源,

FL Studio 是 Image-Line 推出的数字音频工作站,面向音乐制作人、编曲者、歌手及声音设计人员。它将步进音序、钢琴卷帘、音频录制、剪辑、混音、自动化和插件宿主整合在统一环境中,并提供大量乐器、效果器、采样与预设。

Pro Tools 是 Avid 推出的专业数字音频工作站,提供多轨录音、音频剪辑、MIDI编曲、插件处理、自动化混音及影视声音制作能力。它适合音乐人、录音师、制作人和音频后期团队使用,并提供免费入门版、订阅方案及永久授权选择。

Adobe Audition 是面向播客、影视后期、广播与音乐制作的专业音频工作站,提供波形编辑、多轨混音、频谱分析、录音、降噪修复和效果处理等功能。Windows 版通过 Adobe Creative Cloud 安装和管理,

REAPER 是 Cockos 推出的数字音频工作站,适用于录音、MIDI 编曲、音频编辑、混音、母带制作及声音设计。软件安装包小巧,支持多轨录制、灵活路由、自动化、第三方插件和脚本扩展,并提供完整功能的 60 天免费评估期。